Hi again! Want to take the time to Thank you guys for the sweet comments on my previous post. I tried answering everyone, but Google is being funny and freezing my entire pc when I try to post! ack!
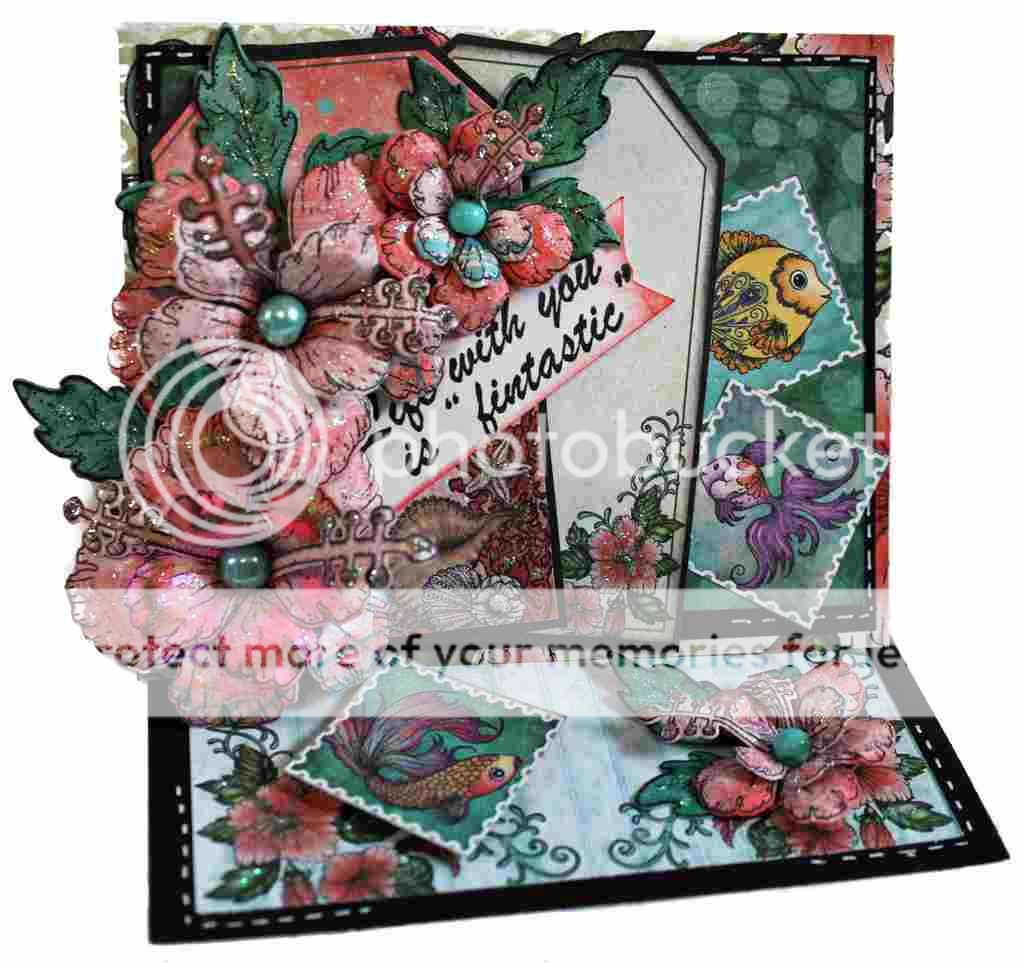
Anyway... I have been creating, which is always the best way to pass my time. I made this easel card using the Heart Felt creations papers, the same Collections as last weeks. I wanted a card that matched my box. This card fits nicely inside the box so now I have a sweet little gift for someone.
I hope this inspires you to create, if you do make a card, show me! I would love to see your creations!
you can send me photos at my email, justafeww@gmail.com.
Also don't forget to Check out the amazing DT inspirations at the Blog today
Here is my project...
Products Used:
Tropical Hibiscus Craft Die HCD1-796
Tropical Hibiscus Cling Stamps HCPC-3736
Heartfelt Wishes Cling Stamps HCPC-3740
Designer Paper Collection - Under the Sea Collection-Life really is better at the seaside.
Other products used, Clear Stickles, Spiced Marmalade and Bundled Sage Distress Inks by Tim Holtz, Black and white card stock, while gel ink pen, foam tape, teal glass beads.
1. Start with a piece of cardstock measuring 8" x 5". Lay it long wise on your scoreboard and score at 2" and 4". Make mountain folds along each score line to create your basic easel card base.
2. Stamp, color and die cut the flowers. I layers two flower petals to create my dimensional flowers, they are finished with Stickles and glass matching beads for the centers. In the same fashion, stamp, color and die cute the leaves or as an alternate to coloring you can always stamp them on green colored cardstock.
3. From the Stamp set, on a 3" x 1" piece of white cardstock, I stamped the sentiment, "Life with you is finstatic" and cut it banner shape.
 4. From the beautiful paper collection I cut two pre printed tags and layered them on black cardstock - cut to size. Also, cut three of the pre printed fish stamp designs from the paper collection and set aside.
5. To make the card panel, cut following pieces from the paper collection:
a 4" x 5" piece of designer paper, a 3 3/4" x 4 3/4" of black card stock, and a 3 1/2" x 4 1/2" piece of designer paper
Layer them by placing the bigger piece on the bottom giving it a framed look. (all this separate pieces of paper will make for a really sturdy card.)
Secure this panel to the front of the card, adding adhesive only to the bottom sections.
6. After everything is layered its time to add the embellishments.
Adhere the two matted tags allowing enough space to add the fish stamps over to the right of the tags. Now, arrange the flowers and leaves on the left side of the card allowing the bottoms images to show through. Among the flowers tuck the stamped banner you created earlier.
 7. Add stitching to the black cardstock both on the bottom and top portion of the card with the while gel pen.
8. For the bottom part of the card, cut a 3 3/4" x 4 3/4" piece of designer cardstock and embellish with a flower and adhere one of the fish stamp pieces with foam tape to give it some height so it will hold the easel part of the card open.
9. The entire card is then made sparkly with Clear Glittered Sparkles.
Anyway... I have been creating, which is always the best way to pass my time. I made this easel card using the Heart Felt creations papers, the same Collections as last weeks. I wanted a card that matched my box. This card fits nicely inside the box so now I have a sweet little gift for someone.
I hope this inspires you to create, if you do make a card, show me! I would love to see your creations!
you can send me photos at my email, justafeww@gmail.com.
Also don't forget to Check out the amazing DT inspirations at the Blog today
Here is my project...
Products Used:
Tropical Hibiscus Craft Die HCD1-796
Tropical Hibiscus Cling Stamps HCPC-3736
Heartfelt Wishes Cling Stamps HCPC-3740
Designer Paper Collection - Under the Sea Collection-Life really is better at the seaside.
Other products used, Clear Stickles, Spiced Marmalade and Bundled Sage Distress Inks by Tim Holtz, Black and white card stock, while gel ink pen, foam tape, teal glass beads.
1. Start with a piece of cardstock measuring 8" x 5". Lay it long wise on your scoreboard and score at 2" and 4". Make mountain folds along each score line to create your basic easel card base.
2. Stamp, color and die cut the flowers. I layers two flower petals to create my dimensional flowers, they are finished with Stickles and glass matching beads for the centers. In the same fashion, stamp, color and die cute the leaves or as an alternate to coloring you can always stamp them on green colored cardstock.
3. From the Stamp set, on a 3" x 1" piece of white cardstock, I stamped the sentiment, "Life with you is finstatic" and cut it banner shape.
 4. From the beautiful paper collection I cut two pre printed tags and layered them on black cardstock - cut to size. Also, cut three of the pre printed fish stamp designs from the paper collection and set aside.
5. To make the card panel, cut following pieces from the paper collection:
a 4" x 5" piece of designer paper, a 3 3/4" x 4 3/4" of black card stock, and a 3 1/2" x 4 1/2" piece of designer paper
Layer them by placing the bigger piece on the bottom giving it a framed look. (all this separate pieces of paper will make for a really sturdy card.)
Secure this panel to the front of the card, adding adhesive only to the bottom sections.
6. After everything is layered its time to add the embellishments.
Adhere the two matted tags allowing enough space to add the fish stamps over to the right of the tags. Now, arrange the flowers and leaves on the left side of the card allowing the bottoms images to show through. Among the flowers tuck the stamped banner you created earlier.
 7. Add stitching to the black cardstock both on the bottom and top portion of the card with the while gel pen.
8. For the bottom part of the card, cut a 3 3/4" x 4 3/4" piece of designer cardstock and embellish with a flower and adhere one of the fish stamp pieces with foam tape to give it some height so it will hold the easel part of the card open.
9. The entire card is then made sparkly with Clear Glittered Sparkles.
Thanks for stopping by...
Enjoy your crafty time!
and as always...


What a stunning card! :D Love all the detail.
ReplyDeleteHugs, Marie
Absolutely Gorgeous!!!!
ReplyDeleteThis is lovely and so creative!
ReplyDeleteGorgeous card, Elsa, I love all the layered elements!
ReplyDeleteGorgeous creation!!
ReplyDeleteHi, I love this full on Easel card!Inky hugs
ReplyDelete