Sunday, December 24, 2017
Friday, October 20, 2017
NOTE CARDS...
Hello!! I have been MIA for a while.
I keep wanting to craft but just can't get motivated.
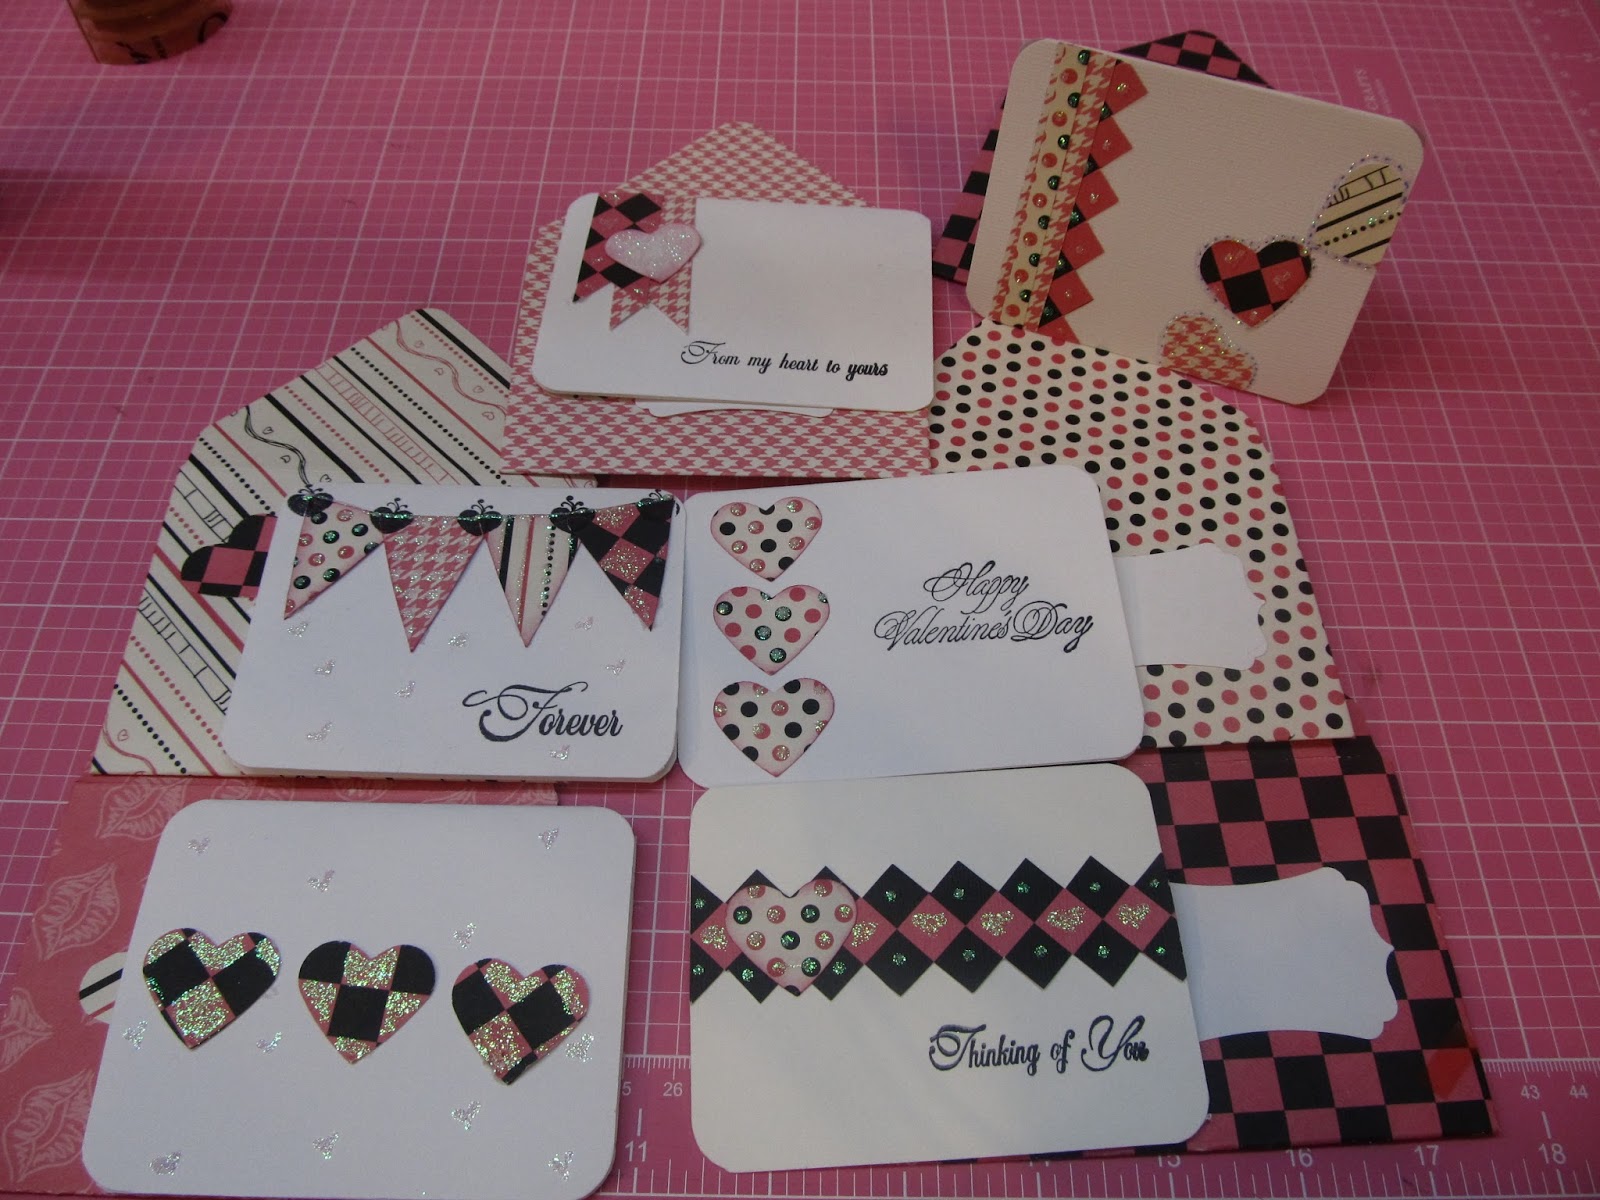
I did want to share these cute note cards with envelopes...
so much fun and I made them while watching TV!!
I used scraps of paper I had laying around, and yes...they are very February! lol
To make these, I finally used my envelope maker, which has been sitting on my table for a few years collecting dust! It was fun... hope you enjoy.... miss you all!!
For more pictures please visit my Facebook page


Thanks so much for visiting!!!
and as always...

Wednesday, March 22, 2017
Monkey heartfelt Card...
hello! I hope you all have been staying busy crafting! I have been having fun with these monkeys...this is the 3rd project with these stamps and dies. I hope you can find some inspiration in my simple cards... no flowers again!


Cut the card base from the white paper card stock using the Nestabilities die cut. Make sure you set the die just a little bit over the edge so it cuts a card base. Fold top part of the card in half, this will create a sort of Z card.


Products used:
HCPC - 3779 Monkey Antics Cling Stamp
HCD1 - 7134 Monkey Antics Die Set
HCPC - 3780 Relaxin'Monkeys Cling Stamps
HCPC - 3777 Palm Tree & Monkeys Cling Stamps
HCP1 - 7132 Palm Tree & Monkeys Die Set'
Monkeying Around paper collection
Other products used Spellbinders Nestabilities labels twenty-two, white and black card stock, to color the palm tree, monkeys and leaves - Memento "Olive Grove, Espresso Truffel and Toffee Crunch"

Now from the paper collection cut 2 shape panels, 1 from the white card stock and 1 from the black card stock. Add one of the panels to the inside of the card, then cut another panel from the smaller die from white card stock and center this onto the card.
Cut one of the sentiments from the paper collection, I used "enjoy" and attache it to the upper corner of the panels.
Now, cut the black and white panels in half and adhere them so that they give the one panel from the collection a "layered" look.
Next, stamp, color and die cut the monkeys, bananas and palm tree and adhere them to the center of the card panels.
You're done, quick and fun.
for more inspirations visit...
Thanks so much for stopping by!!
Wednesday, March 15, 2017
Card, using Monkeys!!
Hello, the most cutsie monkeys come from Heartfelt creations! I made this simple card, and I used no flowers! how about that? Yet I think it's cute!


Here are the instructions and supplies used...
Products used:
HCPC-3778 Monkeying Around Cling Stamps
HCD1-7133 Monkeying Around Die Set
HCD1-7177 Palm Tree and Monkeys Die Cut Set
HCPC-3779 Palm Tree and Monkeys Cling Stamps
Designer "Monkeying Around" Paper Collection
Other products used - White and black cardstock, Stickles "Stardust", MEMENTO Tuxedo ink stamp pads, Blick Studio alcohol markers in "Light Umber", "Lime" "Dark Brown" and "Green Tomatoe" - foam tape.
From white card stock 6 3/4 x 8 1/4, fold in half to make the card base.
From the black card stock cut a 6 1/4 x 4 panel and another white 6 x 3 3/4 panel. Layers these and set aside.
Stamp, color and die cut the cute swinging monkey, the palm tree and flower swag. I adhered them to a piece of white card stock and hand cut them as a grouping.
Use foam tape to attach this grouping to the card.
Stamp the "Relax it's your special day" sentiment from the stamp collection on the left side of the card.
Stickle with "stardust" and you're done.
Visit
Thanks so much for stopping by...
and as always...
Wednesday, February 8, 2017
Heartfelt Easel card...
Hello!! The papers on this collection are my favorite, I really like to work with black and this one sheet of paper I used is black with flowers!! LOVE! so this is what I made...

Products used:
HCPC-3773 Flowering Dogwood Cling Stamps
HCD1-7129 Flowering Dogwood Die Set
HCPC-3776 Dogwood Chapel
Designer "Flowering Dogwood" Paper Collection
 Other products used - White and red card stock, Stickles "Stardust", Stamping UP! "Pink Passion" and "Mello Moss" ink stamp pads, flat back flower beads, Paper Studio butterfly paper punch, Spellbinders Nestabilities Mega Dies Labels Twenty.
Card base die cut using the biggest die in the Nestabilities die set. Fold this card in an easel style card. Finish product is 6 x 4.
Using same big die cut 2 panels from the designer paper, and using the next size down, die cut one more panel.
I used the preprinted image of the dove for my card cover. Adhere the second panel onto the card base,[mine is the pretty floral print set in a black background] then the smaller sized panel on top of that.
Stamp "Happy Easter" and set aside.

Stamp the flowers on a piece of pink designer paper using the Pink Passion stamp pad, die cut and form, do the same to the leaves but use green paper and the Mello Moss ink pad. Put your flowers together, add stickles and the flat back beads and adhere to your card. Punch out a couple of butterflies and add to the card face.
Add a few flowers to the inside of the card and adhere 3 little flat back beads just above the stamped sentiment to keep the card standing up right.
You can purchase all the above products and find awesome inspiration over at
That's it, sweet and simple!
Thanks for stopping by...and as always...
Wednesday, February 1, 2017
Trying my hand at a box!
Hello, this project is made from an old cardboard box I had. It made for a cute altered project. It was easier than I thought to do. I shy away from hard projects but once you get started, it goes by fast, and the heartfelt papers make it so easy to make things cute.

Here is what I used to alter this little box...
Products used:
HCD1-7126 Wildwood Cottage Darlings Die
HCD1-7120 Wildwood Cottage Accent Die
HCPC-3769 Wildwood Florals Cling Stamp
HCD1-7125 Wildwood Florals Die
HCPC-3772 Wildwood Cottage Accents
“Wildwoods Cottage” Paper collection
Other products used: Stickles “star dust”, Memento “Tuxedo Black" to cottage accents, StampinUp! “Forest Foliage” for the foliage and “Chocolate Chip", pearl beads for flower centers, Valspar Satin paint in "Wash Green".

I used a little Card board box that measures 6x4, painted the box inside and out using Valspar Satin paint. Let it dry and then cover the inside and out of the box with using a sheet from the paper collection.
Stamp, color and die cut the fence and fence gate using the Chocolate Chip ink pad. Cut enough to go around the outside of the box.


Stamp, color and die cut flowers and foliage and add them to one corner on the top of the box. Add the beads to the flowers and add a sentiment. Mine is straight from the paper collection.
Add stickles and you’re done!


look at those cute fairies!!
you can purchase them and the paper here :
Here is what I used to alter this little box...
Products used:
HCD1-7126 Wildwood Cottage Darlings Die
HCD1-7120 Wildwood Cottage Accent Die
HCPC-3769 Wildwood Florals Cling Stamp
HCD1-7125 Wildwood Florals Die
HCPC-3772 Wildwood Cottage Accents
“Wildwoods Cottage” Paper collection
Other products used: Stickles “star dust”, Memento “Tuxedo Black" to cottage accents, StampinUp! “Forest Foliage” for the foliage and “Chocolate Chip", pearl beads for flower centers, Valspar Satin paint in "Wash Green".

I used a little Card board box that measures 6x4, painted the box inside and out using Valspar Satin paint. Let it dry and then cover the inside and out of the box with using a sheet from the paper collection.
Stamp, color and die cut the fence and fence gate using the Chocolate Chip ink pad. Cut enough to go around the outside of the box.

Stamp and die cut 2 of the fairies and adhere them to the front and top of the box
I used one of the pre-printed panels on the top of the box, I liked the cottage view.

Add stickles and you’re done!
Thanks so much for stopping by...
Wednesday, January 25, 2017
A wall plaque... yeap no Card today.
Hello all... this week I decide to create a wall plaque using something other than the cottage stamp and die from Heart Felt creation but instead a window die from a previous collection..make sense?
Well take a looksie...what you think???

yeap that is a window die, used with the cottage door and window form this months collection. Below find a list of supplies and instructions,
Products used:
HCD1-7126 Wildwood Cottage Darlings Die
HCPC-3770 Wildwood Cottage Darlings Cling Stamp
HCPC-3771 Wildwood Cottage Cling Stamp
HCD1-7127 Wildwood Cottage Die
HCPC-3769 Wildwood Florals Cling Stamp
HCD1-7125 Wildwood Florals Die
HCD1-7100 Botanic Window Die
HCPC-3772 Wildwood Cottage Accents
“Wildwoods Cottage” Paper collection

Other products used: Stickles “star dust”, Spellbinders Grand Nestabilities “Grand Labels Four”, Memento “Tuxedo Black" to cottage accents, StampinUp! "Pink Passion,” to stamp and color in the flowers, and StampinUp! ink pad in color “Not quite Navy" to stamp doors and windows, “Forest Foliage” for the foliage, Tim Holtz Distress Markers in Walnut Stain, Spun Sugar, Hug Snug seam binding in pink, flat back pink beads and pink pearl beads.
1. This is a Wall hanging sign die cut with the Spellbinder dies. From kraft card stock and from the paper collection die cut 2 of from the biggest size die and one from the designer paper using the second sized die. Layer these on top of each other to make the wall hanging plaque.
2. This time I die cut the Bontanic Window from white card stock and used it as the cottage, the center of the window is cut from the designer paper.
 3. Also stamp, color and die cut the adorable little door, you will have 2 to choose from, and several windows, die cut a window. Add them to your cottage, so now you have a complete cute little cottage! Die cut the HOME SWEET HOME sign and cute little wheel barrel color it in with the Distress Marker in Walnut, the bird bath is also stamped and die cut but colored in with the “Not quite Navy” ink pad.
4. Stamp, color and die cut the flowers and foliage, use the flat back beads as centers for the smaller flowers and use the pink pearl beads on the bigger flowers.
5. Adhere the window to the plaque, the doors and windows and all the flowers. Die cut the fairy from the paper collection using the fair die and adhere her to the bottom right corner of the plaque. Arrange all the flowers and bird bath around the cottage. Stickle add a Treasured tag to complete the look.
6. Punch two holes on the plaque, pull the seam binding through and tie a cute bow.
Well take a looksie...what you think???

yeap that is a window die, used with the cottage door and window form this months collection. Below find a list of supplies and instructions,
Products used:
HCD1-7126 Wildwood Cottage Darlings Die
HCPC-3770 Wildwood Cottage Darlings Cling Stamp
HCPC-3771 Wildwood Cottage Cling Stamp
HCD1-7127 Wildwood Cottage Die
HCPC-3769 Wildwood Florals Cling Stamp
HCD1-7125 Wildwood Florals Die
HCD1-7100 Botanic Window Die
HCPC-3772 Wildwood Cottage Accents
“Wildwoods Cottage” Paper collection

Other products used: Stickles “star dust”, Spellbinders Grand Nestabilities “Grand Labels Four”, Memento “Tuxedo Black" to cottage accents, StampinUp! "Pink Passion,” to stamp and color in the flowers, and StampinUp! ink pad in color “Not quite Navy" to stamp doors and windows, “Forest Foliage” for the foliage, Tim Holtz Distress Markers in Walnut Stain, Spun Sugar, Hug Snug seam binding in pink, flat back pink beads and pink pearl beads.
1. This is a Wall hanging sign die cut with the Spellbinder dies. From kraft card stock and from the paper collection die cut 2 of from the biggest size die and one from the designer paper using the second sized die. Layer these on top of each other to make the wall hanging plaque.
2. This time I die cut the Bontanic Window from white card stock and used it as the cottage, the center of the window is cut from the designer paper.

4. Stamp, color and die cut the flowers and foliage, use the flat back beads as centers for the smaller flowers and use the pink pearl beads on the bigger flowers.
5. Adhere the window to the plaque, the doors and windows and all the flowers. Die cut the fairy from the paper collection using the fair die and adhere her to the bottom right corner of the plaque. Arrange all the flowers and bird bath around the cottage. Stickle add a Treasured tag to complete the look.
6. Punch two holes on the plaque, pull the seam binding through and tie a cute bow.
Thank you so very much for stopping by...
for further inspiration visit...
and as always...
Wednesday, January 18, 2017
Heartfelt Wednesday... a big card this time...
HI!! ohhh you are going to love this Woodlands collection! This week I worked with the cottage...its soo cute and there are endless possibilities on what to create...just go check out the other talented ladies in the design team! but first look at my card ... lol
This was fun to create...

 1. Die cut the outer frame from the Nestabilities die also from the white card stock. This particular die cut set, will only cut the intricate parts and the center, I had to fussy cut the outer edges to get the frame. [I didn't have the outer die to do this with]. Use this same die on a sheet from paper collection, I used blue, you will only use the inside of this die cut.
 4. Also stamp, color and die cut the adorable little door, you will have 2 to choose from, and several windows, die cut 2 windows. Add them to your cottage, so now you have a complete cute little cottage!

This was fun to create...

here are the supplies and instructions...
Products used:
HCD1-7126 Wildwood Cottage Darlings Die
HCPC-3770 Wildwood Cottage Darlings Cling Stamp
HCPC-3771 Wildwood Cottage Cling Stamp
HCD1-7127 Wildwood Cottage Die
HCPC-3769 Wildwood Florals Cling Stamp
HCD1-7125 Wildwood Florals Die
“Wildwoods Cottage” Paper collection
Other products used: Stickles “star dust”, Spellbinders Nestabilities “Nobel Rectangle”, Memento “Tuxedo Black” to stamp the fairy, StampinUp! “Ruby Red” to stamp and color in the flowers, and color “Not quite Navy to stamp doors and windows, “Forest Foliage” for the foliage, Copic Marker in E00 “skin white” for the fairy’s face, white card stock.
This is a big card; the base is 5x7 made from white cardstock.
 1. Die cut the outer frame from the Nestabilities die also from the white card stock. This particular die cut set, will only cut the intricate parts and the center, I had to fussy cut the outer edges to get the frame. [I didn't have the outer die to do this with]. Use this same die on a sheet from paper collection, I used blue, you will only use the inside of this die cut.
2. Die cut the cute cottage from the paper collection; there is a brick themed sheet that works really well for this project. Die cut the roof from a contrasting color and adhere it to the cottage.
3. Now stamp, color and die cut one fairy, [you get 3 to chose from] then do the same for the flowers and the foliage, put these flowers together.
 4. Also stamp, color and die cut the adorable little door, you will have 2 to choose from, and several windows, die cut 2 windows. Add them to your cottage, so now you have a complete cute little cottage!
5. Cut a 4.7 x 6.75 panel from the paper collection and adhere it to the card base, over this panel adhere the outer white frame and the blue insert you had previously cut. Now layer the cottage on the card and adhere the fairy on the left hand bottom portion of the card.
6. Outline the card with the flowers and foliage and add your sentiment on the opposite side. I chose, "Friendships in bloom", it's pre-printed on the paper collection.
Add flat back beads to the flower centers and stickles and you're done.
Thanks so much for stopping by and visit
Heartfelt Creation Blog for more inspiration!!
and as always...
Wednesday, January 11, 2017
Heartfelt Note Cards and Envelopes
yay..Wednesday again...and again I have a very simple Heartfelt Creation project. This time I made 3 quick note cards with envelopes. This type of project is fun and easy to make and so handy to have note cards ready.

The following is are the instructions and supply list...
3 Notecards with Envelopes
Products Used:
HCPC-3770 Wildwood Cottage Darlings Clear Stamps
HCD1-7126 Wildwood Cottage Darlings Die Sets
Wildwood Cottage paper collections
Other products used, Spellbinders Nestabilities Labels 1, Stickles, Whites and light blue card stock, Recollections light pink flat back beads, markers Copic E00 and E11 for skin color on the fairies, RV00 and RV113 for the dresses, 009 Honey Yellow for the fairies hair, "Mowed Lawn"- Tim Holtz distress.
Hello, these instructions are for 3 note cards, with envelopes.
The card base is 4x4 made from the white card stock.
Cut 3 from the largest of the Spellbinders Nestablilites labels 1 out of light blue card stock, 3 from the next size down out of the Wildwood cottage paper collection, and 3 from the next size down also from the color collections. I chose some pretty pink. Layer these on top of each other, you should have 3 layers panels.
Now stamp, color and die cut one of each of the adorable fairy images, add Stickles for that added touch.
Adhere a fairy in each of the panels and adhere it all to the card base.
From the paper collection, die cut 3 sentiments...and add to each note card.
 I made the envelopes using the We R Memory Keepers Envelope Punch Board, there are many video on Youtube showing you how to use this tool. These cards are 4x4 so the envelopes will use a 6 7/8 x 6 7/8 square sheet of white card stock.
After each envelope was complete, I stamped the front with the cute mushroom stamp in "Mowed Lawn"- Tim Holtz distress ink.
The cards fit perfect in each envelope.
That's it, quick, simple, cute note cards.

The following is are the instructions and supply list...
3 Notecards with Envelopes
Products Used:
HCPC-3770 Wildwood Cottage Darlings Clear Stamps
HCD1-7126 Wildwood Cottage Darlings Die Sets
Wildwood Cottage paper collections
Other products used, Spellbinders Nestabilities Labels 1, Stickles, Whites and light blue card stock, Recollections light pink flat back beads, markers Copic E00 and E11 for skin color on the fairies, RV00 and RV113 for the dresses, 009 Honey Yellow for the fairies hair, "Mowed Lawn"- Tim Holtz distress.
Hello, these instructions are for 3 note cards, with envelopes.
The card base is 4x4 made from the white card stock.
Cut 3 from the largest of the Spellbinders Nestablilites labels 1 out of light blue card stock, 3 from the next size down out of the Wildwood cottage paper collection, and 3 from the next size down also from the color collections. I chose some pretty pink. Layer these on top of each other, you should have 3 layers panels.
Now stamp, color and die cut one of each of the adorable fairy images, add Stickles for that added touch.
Adhere a fairy in each of the panels and adhere it all to the card base.
From the paper collection, die cut 3 sentiments...and add to each note card.

After each envelope was complete, I stamped the front with the cute mushroom stamp in "Mowed Lawn"- Tim Holtz distress ink.
The cards fit perfect in each envelope.
That's it, quick, simple, cute note cards.
Thanks for watching... and as always...
Wednesday, January 4, 2017
Today is -- Heartfelt 2017 Wednesday
Hello. I have been MIA, had a rough last few months, but that is a story for later...today it's all about the crafts. I made this cute puppy card with the awesome Heartfelt Creations stamps and dies.
I hope you enjoy and that you're inspired to create...

I hope you enjoy and that you're inspired to create...

Products Used:
HCPC-3644 Birds and Bloom Cling Stamp
HCD1-757 Leafy Branch Craft Die
HCD1-756 Birds and Bloom Craft Die
HCD1-7120 Border Die
HCCF1-443-3 4.25 X 5.5 Foldout Cards Kraft
Designer Collection "Pampered Pooch"
Other products used: Blick Studio markers 075 Terra Cotta, 068 Saffron, 014 Canary Yellow, Memento Tuxedo black, foam tape, black card stock, Stickles, "The Paper Studio -flat back pearls" for flower centers.
Use one of the Foldout Kraft card, and cover it with the designer paper.
From the black cardstock using the border die cut enough to edge all the card tops.
Stamp, color and die cut the flowers. I used two petals per flower and glued them on the upper edges of the cards.
Also fussy cut sentiments to glue on the front, center and back of card. Also, fussy cut the cute pre-printed puppy in the crate, from the designer paper and adhered him to the front of the card.
A little Stickles ... you're done.
Thanks so much for stopping by
and as always...
Subscribe to:
Posts (Atom)