Wednesday, November 9, 2016

Cutest Stamps and Dies ever! HFC

Ohhh goodness...Look at these cute stamps!  Puppies!!
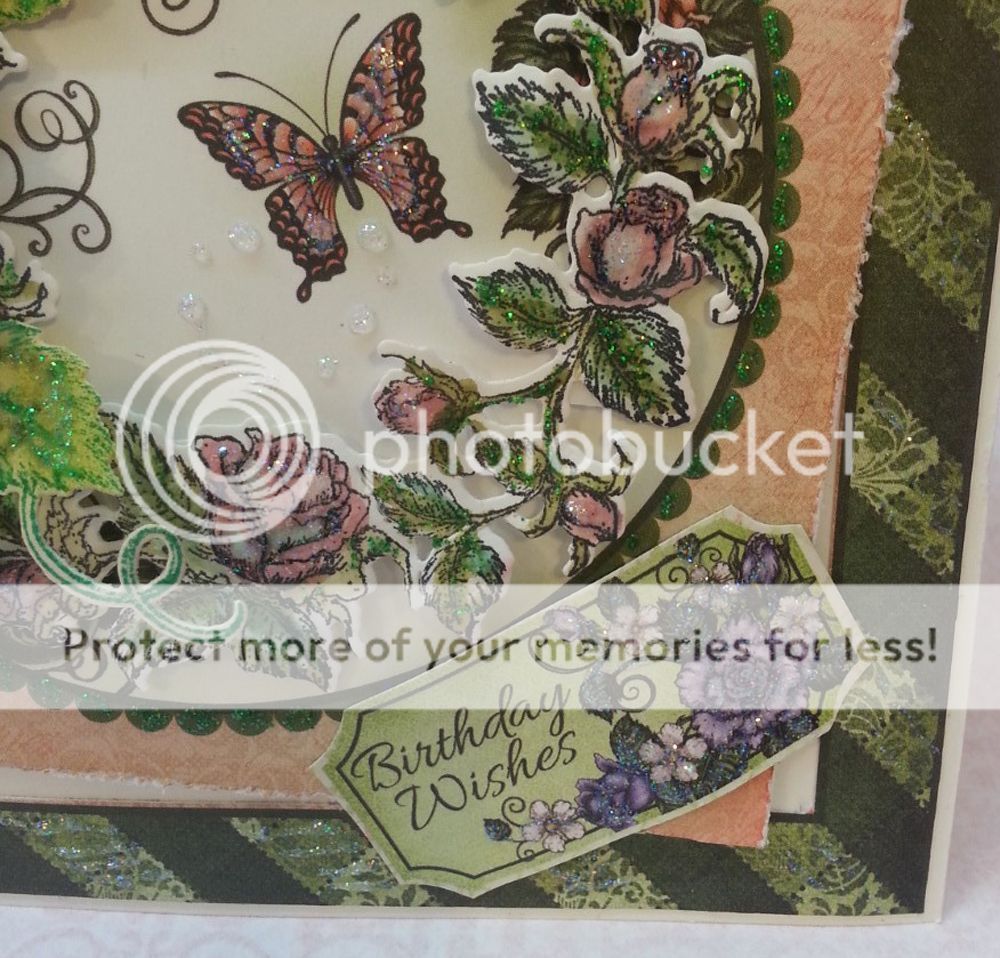
I had so much fun with these stamps, and look! I made a card with no flowers... a challenge for me, but I did it... and of course, I had to add a few butterflies. lol  I have to admit that I have not used puppies to create with before fut it was easy.

HCD1 - 7115 Pampered Pooch Die
HCPC - 3759 Pampered Pooch Pals Cling Stamp
HCD1 - 7119 Die [bone die]
Pampered Pooch designer paper collection

other products: Spellbinders Nestabilities Labels Twenty-Two - MICRON 08 black ink pen - 
Aleene's tacky glue - Blick Studio Alcohol Markers "Sienna" & "Dark Brown" 
- The Paper Studio butterfly paper punch - White and dark blue card stock - foam tape -  Memento Tuxedo ink pad.

Card base is 4.5 x 4.25 from the dark blue card stock.
From the white cardstock cut a 4 x 4.25 square, stamp it with the paw cling stamp, use the black ink pen to draw stitch lines all around the square. Center it on the card base.

From the designer paper die cut 2 panels using the Spellbinders die mentioned above. Layer them on the card base, centering them one on top of the other with foam tape.

Die cut a dog bone from the white card stock and inside of it stamp the heartfelt sentiment "Heard you're having a Ruff Day”. On the corner of the dog bone die cut stamp some paws. Also hand stitch it with the ink pen. 
Stamp, color and die cut the puppy. 

Using the foam tape on the puppy adhere him to the bottom left hand side of the card, right above it, also using foam tape adhere the bone.  
With the butterfly paper punch -- punch out 3 butterflies and adhere them on the card.
Use Stickles to make it sparkle and you're done.


Thank you for stopping by... and as always...


Wednesday, November 2, 2016

1st Wednesday in Nov is a Heartfelt one!

hi! It's November! Already!!!  I just took down Halloween decorations and putting up a few Fall decorations getting ready for Thanksgiving... Christmas will not be up until Dec 1! lol
So for this weeks card I am working with roses, again. I just love these stamps, but stay tuned cause next weeks release is adorable...but now to show you my card for THIS week...

 photo 1 thinking of you card_zpsquxvhioj.jpg


Products Used:
HCD1 - 7113 Blushing Rose Die
HCPC - 3755 Blushing Rose Stem Cling Stamp Set
HCD1 - 743  Raindrop on Roses Die Set
HCPC - 3474 Heartfelt Expressions
Designer paper "Blushing Rose" collection

Other products used: Stickles in "Diamond Dust"- black, white card stock, foam tape, Momento Tuxedo ink pad, Tim Holtz Tonic paper Distresser, BLICK alcohol markers in Lilac and Horizon Blue for the flowers and Green Tomato for the leaves.

This will be a small and simple card.
 photo 2 thinking of you card_zpshd7dbree.jpg

Card base 4.5 x 6
black card stock 5 x 5.5
Designer paper 3.75 x 5. 25


From a smaller piece of designer paper, tear two corner triangles and adhere over the top panel of the card. Turn the corners and distress all the edges with the Tim Holtz distressing tool.

From the Raindrop on Roses Die cut a black delicate lattice work from black and one for a white. Now, glue them one over the other but off set the bottom to cause a shadow effect. I chose to use the black on top. Adhere this to the center of the card base.[set aside]

 photo 3 thinking of you card_zpshegw855h.jpgFrom the Blushing rose, stamp, color and die cute 2 sets of the lavish rose clusters. I used Blick alcohol markers to color them in. Using the foam tape, I adhere one over the other to give it some dimension. Once again with foam tape, adhere this rose cluster to the top of the lattice work on the card base.


From the paper collection I fussy cut 2 of the butterflies and hand stamped the JUST THINKING OF YOU sentiment using the above Heartfelt Expressions cling stamp set.

I cut it around the wording and cut the "about" "you" separately. Then they too were adhered to the card with foam tape and off centered to the bottom right hand side of the card.  Randomly add the butterflies to your card, Stickle and your done.
 photo 4 thinking of you card_zps8w2zojng.jpg

Thank you so much for stopping by and for all you sweet comments! I read and love them all!
thanks!!!! and as always...


Tuesday, October 25, 2016

Heartfelt Wednesday with a Little Creative Embellishments...

Hi!!!  So today I have a purple rose card... The background is a  huge stamp HFC put out this month with the October release and I love it!!  The flowers are hand made, using the stamp and dies from the Blushing Rose collection,  you can click on the following link https://youtu.be/Z8P070kC3oo 
 to learn how to create dimensional roses with this collection. 
 But not only did we get to create with the HFC awesome stamps and dies, we also had a few chipboard pieces from Creative Embellishments!  
here is this weeks card....

 photo Purple roses 1_zpsrcuqvxbq.jpg

Products Used:
HCPC - 3757 Blushing Rose Background Cling Stamp
HCPC - 3752 Classic Rose Cling Stamp
HCD1 - 7110 Classic Rose Die
HCPC - 3546 Classic Leaf Cling Stamp
HCD1 - 736  Classic Leaf Die
Heartfelt Designre paper, "Blushing Rose" collection

other products use:  StampingUp! stamp pad "Eggplant Envy", Tim Holtz "Peeled Paint" distress ink pad, mini flat back pearls, black and white cardstock, foam tape, Stickles "Diamond Dust"
.
Card base 6.25  x 5.25 
Stamp the Blushing Rose Background and cut it down to 5.5 x 4 
From the designer paper cut 5 x 5.75
From Black card stock cut 5.25 x 6

Stamp the background onto the white card stock and color it in with the stamp pad inks mentioned above. I did more of a wash, using a small round water color brush. 
 photo Purple roses 2_zpsasqfy3rq.jpg

Stamp the second background image on a separate sheet of paper and fussy cut around the words "gift", "courage" and most of the rose buds.  These you will adhere to the first background stamped using the foam tape to make your images pop from the card.


Layer this colored in panel onto the designer paper using foam tape, this will make the whole thing pop. Adhere these two layers to the black panel and finally onto the card base.


Adhere some of the flat back pearls onto part of the stamped image, I added them to the words and to the 3 bullet images on the banner.

 photo Purple roses side view_zpsa487ztri.jpg
Stamp, color and die cut enough petals to make 1 big rose and 2 smaller ones. Do the same with the swirly leaf.
I did not want to cover up too much of the background image so I adhere my flowers to the bottom left hand side of the card.  
Stickle it all to make it look sparkly and your're done.


For more inspiration visit the 
Heart Felt Creation's Blog 
click HERE.


NOW...these from the past 2 weeks have those awesome Creative Embellishment chipboard pieces.
here are peaks...scroll down for more details...
Awesome Butterfly...

 photo Rose stems 3_zpsefmyznlm.jpg


Check their site here...
 The items are clean cut and 
really easy to work with...  


And here is the black bird Cage...that was heat embossed with black embossing powders.
 photo blushingcard 2 hb_zpssuaagnyd.jpg     On the right hand panel of my blog here, is a list of all the ladies in the Heartfelt Design team,
visit them for more inspiration and more from Creative Embellishments.

Thank you for visiting and for your support...
and as always...


Wednesday, October 19, 2016

Heart felt Wednesday... Long Stem Roses

Hi!! What is new with all of you?  Not much here but the crafting...the roses keep coming... These two long stem roses were especially fun to color.  There are 2 different sizes in the set and they layer really well one over the other..but here let me show you what I mean...
This is my card this week... I just love using the tags, they really make a project pop, no?

 photo Rose stems 1_zpslcnvghra.jpg 

Products used:
HCD1 - 779 Regal Borders & Pocket Craft Dies
HCD1 - 7113 Blushing Rose Dies
HCPC - 3755 Blushing Rose Stem Cling Stamp
Designer paper 'Blushing Rose' collection

other products used, Chip board butterfly from Creative Embellishment, Stickles in Gold and Star Dust, 3 pearl brads, black card stock, paper crinch tool, Blick markers in Horizon Blue, Celedon Green, Lt Cerulean Blue and  Green Tomatoe.

 photo Rose stems 2_zpsadtvj5ho.jpgStart with a card base 7.5 x 6.25 fold in half.  

from black card stock 3.75 x 6.25

from the designer paper 
3.5 x 6

Layer these on card base.


Die cut two boarders from the Regal Borders, cutting the bottom part from the black card stock and the top portion from the designer paper.
Attach these borders to either side and attach to the card base.

Stamp, color and die cut the  rose buds and the foliage. Attach the to the bottom left hand side of the card. I fussy cut one of the small butterflies from the paper collection and centered it on the flower stems.


Die cut 3 of the pre printed tags. I ran mine thorough a paper crimper and attached them to black card stock. Added the pearl brads to attach the tag toppers. Stagger the three tags on the card.


Stickle one of the Creative Embellishment chipboard butterfly and tuck in between the tags.

 photo Rose stems 3_zpsefmyznlm.jpg

Attached one of the Sentiment tickets from the collect and added Star Dust stickles to the flowers.
your done...

For my inspiration visit
Heartfelt Creation Inspiration Blog

Thanks for stopping by and for your sweet comments!!!
as always...

Wednesday, October 12, 2016

New Release...all about the Blushing Rose

Good morning! It's Wednesday ...yay!! Half the week is gone and we have a new Release!!! I am just thrilled with last months and this months stamps and die. Roses!!! Plus I got to work with some chipboard, compliments of "Creative Embellishments".  The bird house I think added a different touch to my card...this is a big card measuring 5 x 7, but here take a peak and tell me what you think...
supplies and instructions below...


 photo blushingcard 1 hb_zpsyb3jlxbo.jpg

PRODUCTS USED:

HCPC-3756 Blushing Rose Swirls Cling Stamp
HCD1-7114 Blushing Rose Swirls Dies
Blushing Rose designer paper collection

other products used:  Creative Embellishments chipboard bird cage, Versa mark embossing ink pad, black embossing powder, Stickles, Spellbinders  5 x 7 Detailed Scallops 4, Versa Mark embossing ink, heat gun, Blick Studio in colors Lilac and Light Periwinkle for the flowers and Olive and Green Tomato for leaves. White and black card stock.

 photo blushingcard 2 hb_zpssuaagnyd.jpgMake a 7 x 5 card base from white card stock.
From the designer paper [solid color] cut a 6.75 x 4.75 panel and layer onto card base.
Now die cut using the Spellbinders die using the biggest of the dies from the black card stock. Layer this onto the card base, then from the designer paper, cut one of the 6 x 4 pre-printed panels and layer this onto the base.


Today I used a bird cage from Creative Embellishment. I stamped it with a Versa mark ink pad and embossed it with black embossing powder.
Adhere it with wet glue to the front of the card.


 photo blushingcard 4 corner_zpsfq5p1p2o.jpg


Stamp, color and die cut some of the roses from the Blushing rose swirls. I stamped two images and then cut one of them apart. I used the rose buds to make the one stamped image look bigger and cover the corner.


 I arranged this around the bottom portion of the bird cage.

 photo blushingcard 3 hb_zpsfczgj66j.jpg
Cut one of the Happy Birthday tickets from the designer paper and add it to the upper left hand corner.
Stickle everything you want shinny and you're done.

I hope you enjoy your day today and that you are inspired to create...
visit
HeartFelt Creations
for lots and lots more inspiration and to get your supplies.

Thank you so much for visiting and as always...

Wednesday, October 5, 2016

Roses done in purple... Heartfelt day.

Stamping is new to me, only a few years ago I started to get deep into it. By that I me an I've been buying and hoarding stamps, but have I truly used them? Nope... I have some still in their new package, so I have to admit that using the Heartfelt stamps and dies has been new experience.  All the stamps are so easy to work with and having the coordinating dies makes each project easy to accomplish.  This week, I worked with purple... a color I seldom use, but I think I might add it to my favorite's list.  This is my card this week... I stamped and colored this rose with StampingUP! purple plumb... first time using them also. lol


 photo for my Friends 2_zpsfk1nhz6o.jpg


HCP1-736 Classic Leaf Die
HCD1-7111 Classic Rose Vine Die
HCPC-3753 Classic Rose Vine Cling Stamp
HCPC-3545 Open Leaf Cling Stamp
Designer paper. "Classic Rose Collection"


 photo for my Friends 1_zps3ltscu3l.jpgOther products used: Spellbinders Nestabilities 4 - Floral Ovals, White card stock, Sheer white ribbon, Stickles, "Diamond Dust", Tim Holtz distress inks in "Peeled Paint", StampinUP! Perfect Plum Purple ink pad.

Start with a 5.75 x 6 card base.

From the designer paper cut a 5.50 x 5.75 and a 5.25 x 5.50 and layer them on the card base.

Using the spellbinders die cut 2 using the larger die one from the white card stock and one from the designer paper, I cut mine from a pink sheet of the designer paper.

Die cut enough petals and leaves to make 1 flower. I used a piece of purple paper from the collection. Made one rose and centered it on the leaf. Added Stickles and set it aside to dray.  The leaves I colored with the Tim Holtz Peeled Paint ink.

 photo for my Friends 3 single flower_zpszpsqsr9f.jpgUsing the Plum Purple ink pad shade the outside of the Spellbinders die and adhere it turned horizontally on the card, then layer the second die cut piece vertically on the card.

On the upper left hand side of the card make a bow using the ribbon and glue the single rose and leaf you previously made, on the bow.

On a piece of white paper, stamp the single rose from the Classic Rose Vines Cling stamp and color it in with the inks mentioned above. Die cut this colored rose image and then stamp and die cut a second piece.
Now, using foam tape adhere one over the other and center it on the card using some more foam tape to give it even more dimension.


 photo for my Friends 5_zpseg6txpdd.jpg Cut one of the pre-printed sentiments, I chose "for my firends," and glue it on the bottom of the rose.

Simple and quick...  you're done.


Thanks so much for watching!!!


Wednesday, September 28, 2016

Inspiration Heartfelt Wednesday!

Wednesday...hump day! Only a couple days till Friday my favorite day of the week. I have been video taping a little bit more and thanks to Heartfelt creations I have been creating at least one project a week and it has been so much fun!! This week I didn't know if I wanted to make a card or a tag, so I started with a card and added a tag lol  Nah', I made a tag... loving this colors.
What do you think...

 photo Tag Roses 5_zpsdeb1qxrn.jpg

Really easy to make... here is what I used...

HCD1-7110 Classic Rose Die
HCD1-7111 Classic Rose Vine Die
HCPC-3752 Classic Rose Cling Stamp
HCPC-3753 Classic Rose Vine Cling Stamp
Designer paper. "Classic Rose Collection"


Other products used Pin floral flat back bead, white, red, black card stock, 3" piece trim, Stickles, "Diamond Dust", Tim Holtz distress inks in "Peeled Paint" and "Spun Sugar" Recollection bling

 photo Tag Roses 2_zpsjpvb3oqz.jpg 

3.75 x 4.75 white card stock
3.50 x 4.50 designer paper,
4 x 5 black card stock
layer this pieces one on top of the other. On this last layer, curl the edges inward. From the paper cut some of the pre-printed small roses and leaves and tuck them on each corner of the tag behind the curled edged.

From the Classic Rose paper collection cut one of the pre-printed tag and distress and tear the edges and layer on top.  At the base of this tag add the pretty piece of trim.
 photo Tag Roses 34_zpst9trs8aq.jpg

Stamp, color and die cut enough petals and leaves to make 3 flowers. [color flowers and leaves with the above mentions Tim Holtz distressed inks.

 photo Tag Roses 3_zpsjlm7gpyw.jpg
Arrange the flowers over the vines on the Tag and center the Bling, also cut one of the pre-printed tickets, I used "A Gift of Love" sentiment, and adhere it on the bottom right side of the tag.

Add a piece of designer paper 4 x .50, fold it in half and adhere to the top of the tag, adhere the flat back bead.


Use a little Stickles ...and you are done.

 photo Tag Roses 1_zps3io2l4ap.jpg

Thank you all so very much for stopping by... I read and appreciate all your comments.
I don't always have to answer, but I THANK you for taking the time to read, comment and for all your support!!!

as always...


Wednesday, September 21, 2016

Birthday Wishes Card ...Heartfelt Roses

HI... so who all has birthdays today???  Did you all read how NASA supposedly changed all of our horoscopes??  Well NOT happening, I will for ever be a Pisces...what sign are you?  This card was fun to create and the Heartfelt Creation Roses are so easy to use and makes creating fun!

this is my card this week... Lots of green huh? love it!
 photo 01 CR Birthday Wishes Card_zpsorqxdhfn.jpg


PRODUCTS USED:
HCPC - 3754 Classic Rose Bouquet Cling stamp
HCD1 - 7112 Classic Rose Bouquet Die
HCD1 - 7110 Classic Rose Die
HCPC - 3752 Classic Rose Cling Stamp
HCD1 - 7111 Classic Rose Vine Die
HCPC - 3753 Classic Rose Vines Cling Stamp
Classic Rose paper collection

Other products used, Stickles “Star Dust", white card stock, Tim Holtz Distress ink in "Forest Green" "Evergreen Bough" and "Victorian Velvet", Big shot, mounting foam tape

Make a 6 x 6 card base from the white card stock.
From the designer paper, cut one of the pre- printed images. I chose the green trimmed with butterfly.  Cut the center piece and rough up the edges.

 photo 02 CR Birthday Wishes Card_zps23jwssqg.jpg


Adhere the green boarder on the card base and then off center the inside piece using a few strips of foam tape to make this part of the card a tad higher than the rest.


Stamp the Classic Rose wreath and color it in, I used the Victorian Velvet distress ink using a brush. [Water color style], then moved on to the leaves.


Die cut the wreath, Stickle it and set it aside to dry.  Now the main rose, I did not stamp, I just used the dies and made one single Classic rose. Stamp the Vines, color and Stickle them also.

Adhere the rose wreath to the center of the card allowing the butterfly to show through, layer the vines and center the rose.  Cut one of the pre-printed ticket sentiments I chose "Birthday Wishes," from the paper collection and you are done!

 photo card CR Bday Wishes 3_zps8ifssgta.jpg

Thanks for visiting... and as always...


Wednesday, September 14, 2016

Heartfelt Classic Rose Card...

Hello!!! It's Release day for the "Classic Rose" collection!!!  and I was so ready to create something other than Christmas cards lol I loved the snowmen and cute spruce trees but look at these Roses!!!  I love flowers, they make everything so pretty and they are a great way to fill up and empty space...so here is my first creation using these awesome stamps and dies...what ya' think???


here are some simple instructions...
Products Used
Classic Rose Cling Stamp Set, HCPC-3752
Classic Rose Vines Cling Stamp Set, HCPC-3753
Classic Rose Die, HCD1-7110
Classic Rose Vines Die, HCD1-7111
Classic Rose Paper Collection, HCDP1-27

Products: Black and cream card stock, 3 glass beads, Stickles, "Diamond Dust", Tim Holtz distress inks in "Peeled Paint" and "Spun Sugar"

Watch this video https://youtu.be/Z8P070kC3oo to learn how to create dimensional roses with the Classic Rose Collection.


Instructions: Start by folding a 12" x 6" sheet cream card stock in half to get a 6" x 6" card base. From the black card stock cut a 5.75" x 5.75" square and adhere to the front of the card base. From designer paper cut a 5.5" x 5.5" square and layer this over the black card stock on the card base.

From the designer paper, cut the pre printed image BEAUTIFUL banner and center on the card.

Stamp, color and die cut enough petals and leaves to make 6 flowers. Color flowers and leaves with the distressed inks. Put flowers together and add the glass beads to 3 of the flowers as centers. Arrange the flowers around the banner, use Stickles to give it that special sparkle...and you're done!


Thanks so much for watching...and as always...


Wednesday, September 7, 2016

Heartfelt Wed... Celebrate the Season, Snowman card

Hello! Sept is here. Wow! Where did Aug go???  Pretty soon, Christmas will be here, I feel so rushed! lol How many of you all getting ready for the Holiday already?  Making these few Christmas cards for the Heartfelt Design Team have really put a rush on me this year. I have completed 10 card with envelopes mind you, lol that is the most I've done in years to prepare for any holiday.  Here is one more Christmas card I made to try and inspire you guys.
Let me know what you think...


This is a very sparkly card, thanks to Stickles [which I put on EVERYTHING!] but the picture did not capture it  :(
Here is how it was made and what was used...

Products used:
HCD1-7108 Snow Kissed Flakes and Tag dies
HCD1-743 Raindrop on Roses Die
HCPC-3750 Frolicking Frosty Cling Stamp
HCD1-7107 Frolicking Frosty and Spruce dies
Snow Kissed Paper Collection

Other materials used, white card stock, Stickles "Star Dust", Copic markers RV69 Peony - B95 Light Grayish Cobal - B10 Cool Shadow, paper rounding tool, flat back blue beads.

This card is the easiest card ever.
1. You will need a piece of white cardstock 6 x 9.50, fold in half, this makes your card base.

2. Cut a 5.75 x 4.50 piece of paper from the Snow Kissed Collection, [round all four edges] this will make the first mat you will layer over your card base.


3. Die cut Large Snowflake Background which measures 4.2 x 4.2" from the designer paper collection and die cut the Decorative Snowflake which measures 4 x 4" and the lacy accent that features hearts nestled amidst elegant swirls also from the white card stock.


4. Stamp, color using the Copic markers mentioned above and die cut the cute snowman. Stickel his scarf and set him aside to dry.


5. From the designer paper, cut a sentiment of choice, I liked one that read, "Celebrate the Season".  Layer it over a piece of white card stock and cut each side banner style.


6. Layer it all, adhere the lacy accent to the mat then the snowflake background and the decorative snowflake. on the left hand side add your cute snowman and the sentiment on the right hand side. Add a tiny flat back bead to the corners, Stickle the white snowflake and you're done!


 photo Celebrate the Season 3_zps9onljuq5.jpg

Thank yo so much for stopping by an as always...


Wednesday, August 31, 2016

How about 1 more Christmas card?

Ok...so one more! just one more Christmas card...for now. lol  This card as the one before I made using the Spellbinder labels 25.  Love these dies, I think they are sooo darn pretty!!  Anyway...used the same color combo as last week, but the orientation is different and I used an additional die layers plus the TREES! no tress last week... these trees are so fun to work with...I know I keep saying that but they are. I had lost my mojo there for a while, but having papers, stamps and dies in a theme, make creating easy.  I am also a new sequin addict! I added them to the snowflake centers. Tell me what you think....See the sequins?  In person, this card is really sparkly...

 photo Merry Christmas card 1_zpsw0j4rgkj.jpg

The tree you see there up front, i folded in half and glued it on the crease so there is a lot of dimension on this card.

Here are the instructions:
HCD1-7106 Die [for Poinsettia]
HCPC-3747 Cling Stamps Celebrate the Season
HCPC-3749 Cling Stamps Snow Kissed Spruce
HCD1-7107 Die
HCD1-7109 Die
HCPC-3748 Cling Stamp gift wrapped presents
Designer paper "Snow Kissed"

Spellbinders Nestabilities "Majestic Labels twenty-five", Stickles "Star Dust", glass beads, Color Box stamp pad "Silver", white card stock, Copic marker G21 Lime Green, Iridescent  sequins,

Cut a piece of white card stock 6 3/4 x 9 and fold it in half to make the card base.

 photo Merry Christmas card 2_zpsz1vjxhth.jpgCut one set of each of the decorative layers from the Spellbinders dies.
Stamp Merry Christmas on one of the die cut pieces.
Stamp 3 of the medium spruce trees, enough poinsettias to make 2 flowers with leafs, and 4 of the small snowflakes with the Silver stamp pad. Stickles the trees and snowflakes.

Put the flower together, color the leafs with the lime green Copic marker, add the glass beads and stickles.
Layer all the die cut pieces on the card base.
Arrange the flowers on one end of the card and the trees on the other.
Glue snowflakes all around the card and add the sequins in the center to make them sparkle.

Stamp a sentiment on the inside of the card and add a few snowflakes on the each corner.

you can get all these awesome products at  :  Heartfelt Creations < click that... go have fun shopping!

Thanks you so much for stopping by...
and as always...


Wednesday, August 24, 2016

Heartfelt Winter Holidays Card

Hi friends!!  Christmas is still going hard with the cards here in the justafew home! This time I am really liking the "Blue."  I have made this card in different shades of blue and white... the mini poinsettias are just so much fun to make and they really make all the cards look so nice, they make a great addition and fill in any open spaces.  The inside of the flowers are glass beads... I am really liking this look...what do you guys think?

 photo Winter Card 3_zps2emc7tj4.jpg

Here are the instructions...
Products Used:
HCD1-7106 Die [for Poinsettia]
HCD1-743 Raindrops on Roses Die
HCPC-3747 Cling Stamps Celebrate the Season
Designer paper "Snow Kissed"

 photo Winter Card 1_zpsza5mdogz.jpgSpellbinders Nestabilities "Majestic Labels twenty-five", Stickles "Star Dust", glass beads, ColorBox stamp pad "Silver", Recollections Bling, Sheer ribbon, light blue and white card stock, Copic marker G21 Lime Green.

Cut a piece of light blue card stock 8x7 and fold it in half to make the card base.

Die cut 2 of the half shaped lacy, romantic accent from the Raindrops on Roses Die from the white card stock
and 2 of the nested shapes from the Spellbinders dies. Cut the bigger from the designer paper, I used a piece of dark blue so it would stand out and I cut the smaller of the two from white card stock. 

Layer this pieces over the card base. 

Stamp with the silver stamp pad enough Poinsettias to make 4 sets of flowers and leafs.
Color the leafs withthe Lime Green copic marker and die cut them. 
Put them together, stickle them and set them aside to dry.


 photo Winter Card Inside_zpsankolvkc.jpgDie cut one of the smaller solid pieces from the Spellbinders die set and use it on the inside of the card and stamp or hand write your sentiment.
Now, layer the flowers on the card, and add the bling.

Hand cut one of the pre printed sentiments form the paper collection and center it on the card.
 photo Winter Card 2_zpspm5qjftb.jpg 

Adhere the sheer ribbon bow on the top of card...and you're done.

Thanks so much for visiting...and as always...