Wednesday, September 28, 2016

Inspiration Heartfelt Wednesday!

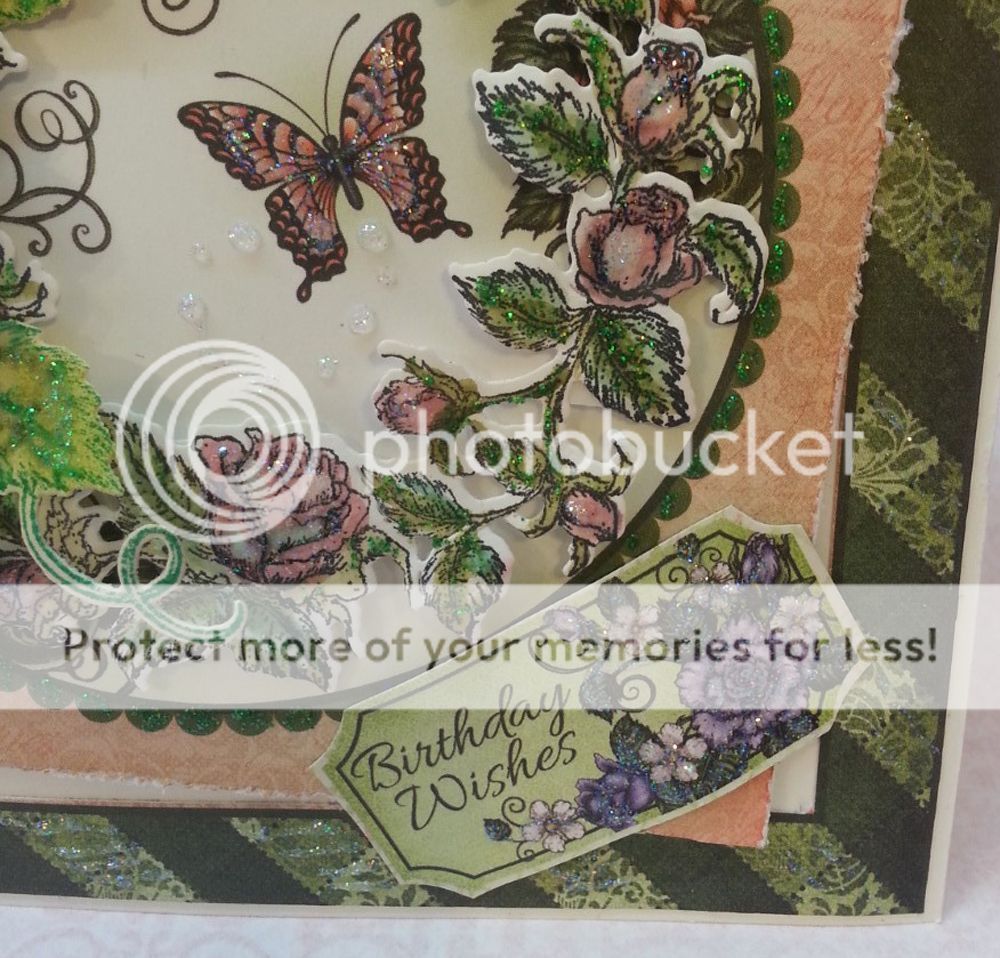
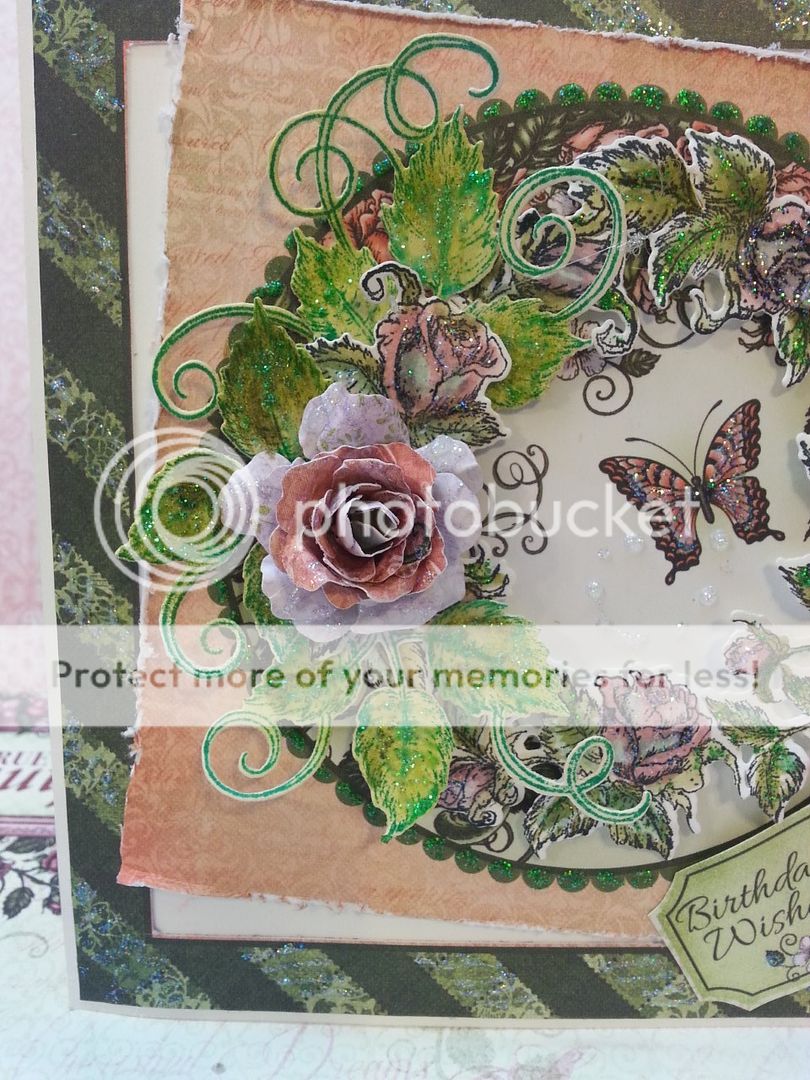
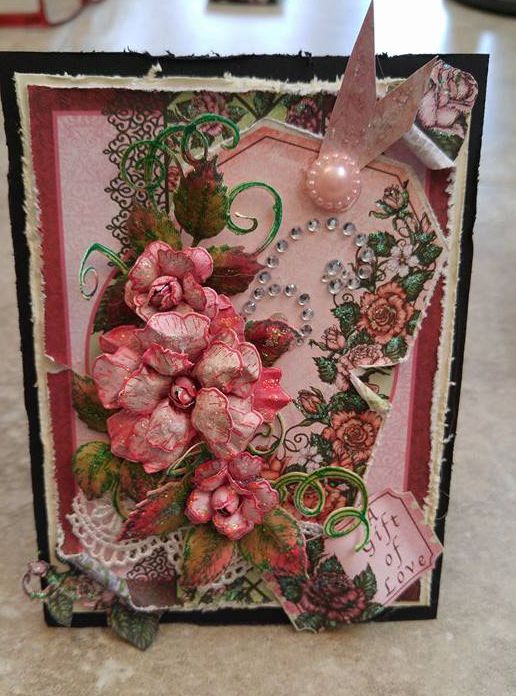
Wednesday...hump day! Only a couple days till Friday my favorite day of the week. I have been video taping a little bit more and thanks to Heartfelt creations I have been creating at least one project a week and it has been so much fun!! This week I didn't know if I wanted to make a card or a tag, so I started with a card and added a tag lol  Nah', I made a tag... loving this colors.
What do you think...

 photo Tag Roses 5_zpsdeb1qxrn.jpg

Really easy to make... here is what I used...

HCD1-7110 Classic Rose Die
HCD1-7111 Classic Rose Vine Die
HCPC-3752 Classic Rose Cling Stamp
HCPC-3753 Classic Rose Vine Cling Stamp
Designer paper. "Classic Rose Collection"


Other products used Pin floral flat back bead, white, red, black card stock, 3" piece trim, Stickles, "Diamond Dust", Tim Holtz distress inks in "Peeled Paint" and "Spun Sugar" Recollection bling

 photo Tag Roses 2_zpsjpvb3oqz.jpg 

3.75 x 4.75 white card stock
3.50 x 4.50 designer paper,
4 x 5 black card stock
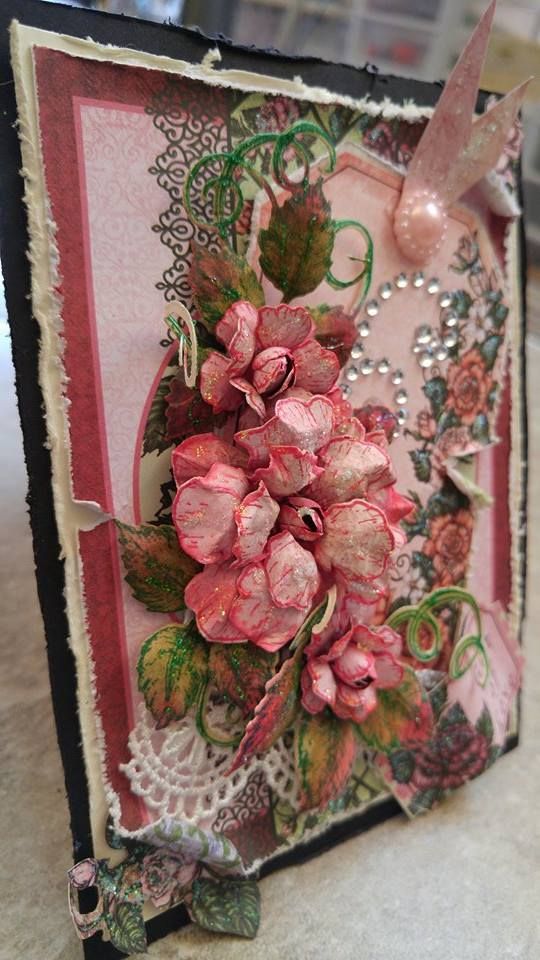
layer this pieces one on top of the other. On this last layer, curl the edges inward. From the paper cut some of the pre-printed small roses and leaves and tuck them on each corner of the tag behind the curled edged.

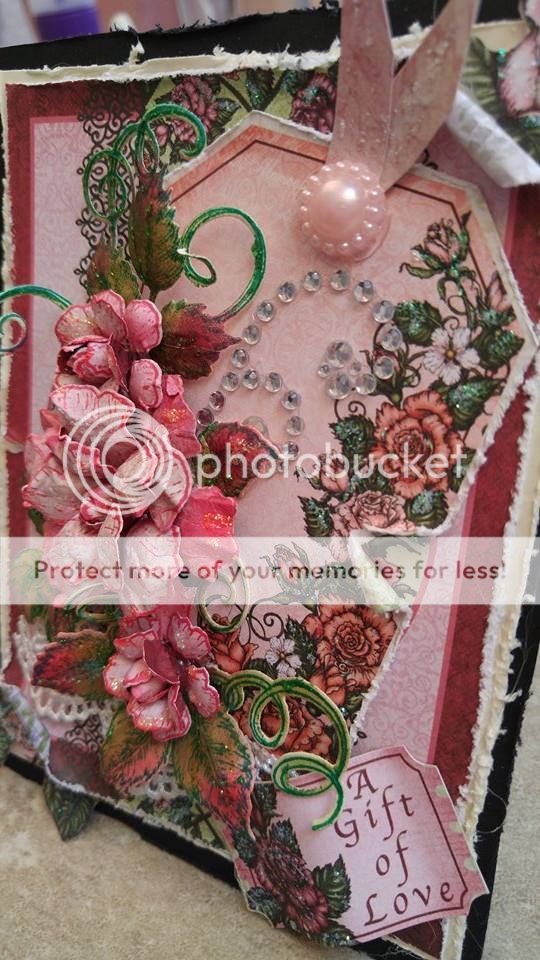
From the Classic Rose paper collection cut one of the pre-printed tag and distress and tear the edges and layer on top.  At the base of this tag add the pretty piece of trim.
 photo Tag Roses 34_zpst9trs8aq.jpg

Stamp, color and die cut enough petals and leaves to make 3 flowers. [color flowers and leaves with the above mentions Tim Holtz distressed inks.

 photo Tag Roses 3_zpsjlm7gpyw.jpg
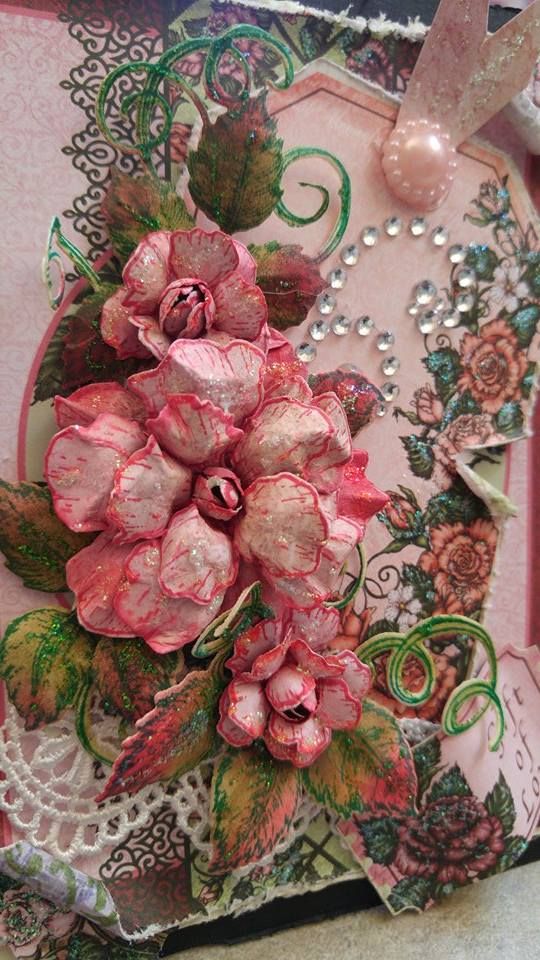
Arrange the flowers over the vines on the Tag and center the Bling, also cut one of the pre-printed tickets, I used "A Gift of Love" sentiment, and adhere it on the bottom right side of the tag.

Add a piece of designer paper 4 x .50, fold it in half and adhere to the top of the tag, adhere the flat back bead.


Use a little Stickles ...and you are done.

 photo Tag Roses 1_zps3io2l4ap.jpg

Thank you all so very much for stopping by... I read and appreciate all your comments.
I don't always have to answer, but I THANK you for taking the time to read, comment and for all your support!!!

as always...


Wednesday, September 21, 2016

Birthday Wishes Card ...Heartfelt Roses

HI... so who all has birthdays today???  Did you all read how NASA supposedly changed all of our horoscopes??  Well NOT happening, I will for ever be a Pisces...what sign are you?  This card was fun to create and the Heartfelt Creation Roses are so easy to use and makes creating fun!

this is my card this week... Lots of green huh? love it!
 photo 01 CR Birthday Wishes Card_zpsorqxdhfn.jpg


PRODUCTS USED:
HCPC - 3754 Classic Rose Bouquet Cling stamp
HCD1 - 7112 Classic Rose Bouquet Die
HCD1 - 7110 Classic Rose Die
HCPC - 3752 Classic Rose Cling Stamp
HCD1 - 7111 Classic Rose Vine Die
HCPC - 3753 Classic Rose Vines Cling Stamp
Classic Rose paper collection

Other products used, Stickles “Star Dust", white card stock, Tim Holtz Distress ink in "Forest Green" "Evergreen Bough" and "Victorian Velvet", Big shot, mounting foam tape

Make a 6 x 6 card base from the white card stock.
From the designer paper, cut one of the pre- printed images. I chose the green trimmed with butterfly.  Cut the center piece and rough up the edges.

 photo 02 CR Birthday Wishes Card_zps23jwssqg.jpg


Adhere the green boarder on the card base and then off center the inside piece using a few strips of foam tape to make this part of the card a tad higher than the rest.


Stamp the Classic Rose wreath and color it in, I used the Victorian Velvet distress ink using a brush. [Water color style], then moved on to the leaves.


Die cut the wreath, Stickle it and set it aside to dry.  Now the main rose, I did not stamp, I just used the dies and made one single Classic rose. Stamp the Vines, color and Stickle them also.

Adhere the rose wreath to the center of the card allowing the butterfly to show through, layer the vines and center the rose.  Cut one of the pre-printed ticket sentiments I chose "Birthday Wishes," from the paper collection and you are done!

 photo card CR Bday Wishes 3_zps8ifssgta.jpg

Thanks for visiting... and as always...


Wednesday, September 14, 2016

Heartfelt Classic Rose Card...

Hello!!! It's Release day for the "Classic Rose" collection!!!  and I was so ready to create something other than Christmas cards lol I loved the snowmen and cute spruce trees but look at these Roses!!!  I love flowers, they make everything so pretty and they are a great way to fill up and empty space...so here is my first creation using these awesome stamps and dies...what ya' think???


here are some simple instructions...
Products Used
Classic Rose Cling Stamp Set, HCPC-3752
Classic Rose Vines Cling Stamp Set, HCPC-3753
Classic Rose Die, HCD1-7110
Classic Rose Vines Die, HCD1-7111
Classic Rose Paper Collection, HCDP1-27

Products: Black and cream card stock, 3 glass beads, Stickles, "Diamond Dust", Tim Holtz distress inks in "Peeled Paint" and "Spun Sugar"

Watch this video https://youtu.be/Z8P070kC3oo to learn how to create dimensional roses with the Classic Rose Collection.


Instructions: Start by folding a 12" x 6" sheet cream card stock in half to get a 6" x 6" card base. From the black card stock cut a 5.75" x 5.75" square and adhere to the front of the card base. From designer paper cut a 5.5" x 5.5" square and layer this over the black card stock on the card base.

From the designer paper, cut the pre printed image BEAUTIFUL banner and center on the card.

Stamp, color and die cut enough petals and leaves to make 6 flowers. Color flowers and leaves with the distressed inks. Put flowers together and add the glass beads to 3 of the flowers as centers. Arrange the flowers around the banner, use Stickles to give it that special sparkle...and you're done!


Thanks so much for watching...and as always...


Wednesday, September 7, 2016

Heartfelt Wed... Celebrate the Season, Snowman card

Hello! Sept is here. Wow! Where did Aug go???  Pretty soon, Christmas will be here, I feel so rushed! lol How many of you all getting ready for the Holiday already?  Making these few Christmas cards for the Heartfelt Design Team have really put a rush on me this year. I have completed 10 card with envelopes mind you, lol that is the most I've done in years to prepare for any holiday.  Here is one more Christmas card I made to try and inspire you guys.
Let me know what you think...


This is a very sparkly card, thanks to Stickles [which I put on EVERYTHING!] but the picture did not capture it  :(
Here is how it was made and what was used...

Products used:
HCD1-7108 Snow Kissed Flakes and Tag dies
HCD1-743 Raindrop on Roses Die
HCPC-3750 Frolicking Frosty Cling Stamp
HCD1-7107 Frolicking Frosty and Spruce dies
Snow Kissed Paper Collection

Other materials used, white card stock, Stickles "Star Dust", Copic markers RV69 Peony - B95 Light Grayish Cobal - B10 Cool Shadow, paper rounding tool, flat back blue beads.

This card is the easiest card ever.
1. You will need a piece of white cardstock 6 x 9.50, fold in half, this makes your card base.

2. Cut a 5.75 x 4.50 piece of paper from the Snow Kissed Collection, [round all four edges] this will make the first mat you will layer over your card base.


3. Die cut Large Snowflake Background which measures 4.2 x 4.2" from the designer paper collection and die cut the Decorative Snowflake which measures 4 x 4" and the lacy accent that features hearts nestled amidst elegant swirls also from the white card stock.


4. Stamp, color using the Copic markers mentioned above and die cut the cute snowman. Stickel his scarf and set him aside to dry.


5. From the designer paper, cut a sentiment of choice, I liked one that read, "Celebrate the Season".  Layer it over a piece of white card stock and cut each side banner style.


6. Layer it all, adhere the lacy accent to the mat then the snowflake background and the decorative snowflake. on the left hand side add your cute snowman and the sentiment on the right hand side. Add a tiny flat back bead to the corners, Stickle the white snowflake and you're done!


 photo Celebrate the Season 3_zps9onljuq5.jpg

Thank yo so much for stopping by an as always...