Hello!! So I had a little time and made this gift caddy... when your done you can add a little crafting yummies and give to someone who would love it!
Tell me what you think... it will accomadate 3 small Stickle bottles...and who doesn't LOVE Stickles!

Products used:
HCDI-7104 Ornate Sleigh and Presents Die
HCD1-7016 Celebrate the Season Die
HCPC-3747 Celebrate the Season Cling Stamp Set
Celebrate the Season designer paper
Other products used... Gold Washi Tape, Want2Scrap self-adhesive bling, 3 1/2 wood circle, Stickles Diamond, cardboard/card stock, Spectrum Noir Sparkle pen Boudoir and Holy Leaf color, Apple Barrel acrylic paint in Purple, Xyron sticker maker.
Cut one 3 1/2" x 8"-- a 2" x 8" --a 3" x 1/2" and --a 1" x 8" from heavy duty chipboard/card stock, Paint one side of each piece with a coordinating color. I used dark purple acrylic paint.
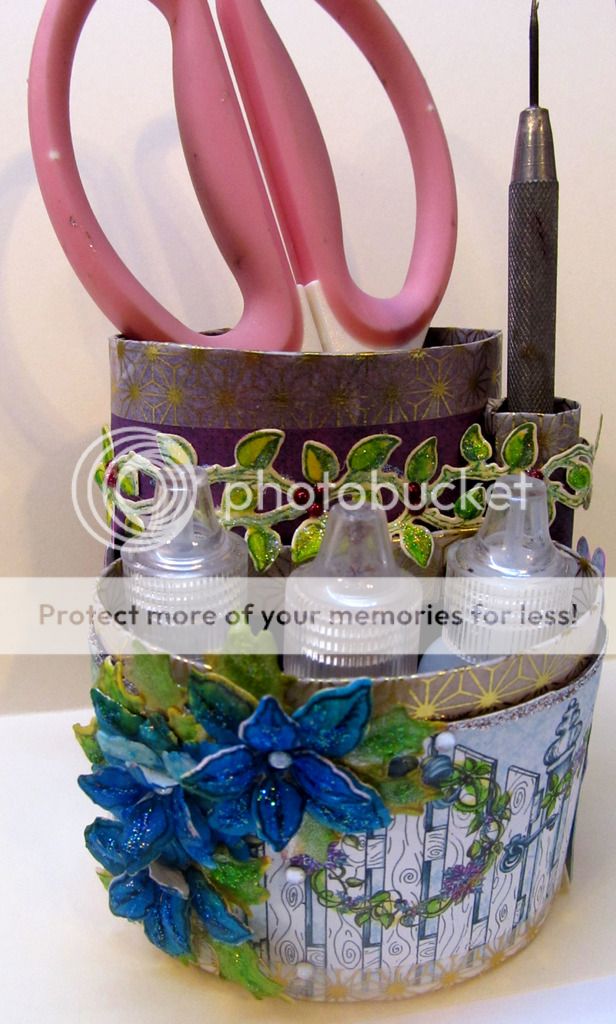 Cover the 2x8 and the 1x8 piece with designer paper from the collection and glue each end to form a tube/cylinder.
Cover the top of the 1 x 8 cylinder with gold washi and glue this tube inside the top of the 2x8 cylinder to make it look like there is a cylinder within a cylinder. Add Stickles to the surrounding area where the two pieces meet. Set these aside to dry.
Cover the other two pieces and also glue them together to make 2 different tubes. One will be taller than the other. Cover each of these pieces using your favorite papers from the designer paper collection. You will end up with 3 tubes in different sizes. Cover the tops with Washi of your choice, I used gold washi since it's a Christmas project.
Now adhere the two bigger tubes together. When gluing the front piece to the taller tube, elongate the tube and hold it till it adheres completely to the other cylinder. It will look like the taller tube is circular, but the smaller tube is oval, you will be able to fit 3 stickle bottles in this area. Now, the smallest tube is just big enough to hold a pencil, or other crafty tool. Adhere it on the right side of the caddy. Using Washi tape, adhere the newly created caddy to the circular wood piece to give your caddy a base.
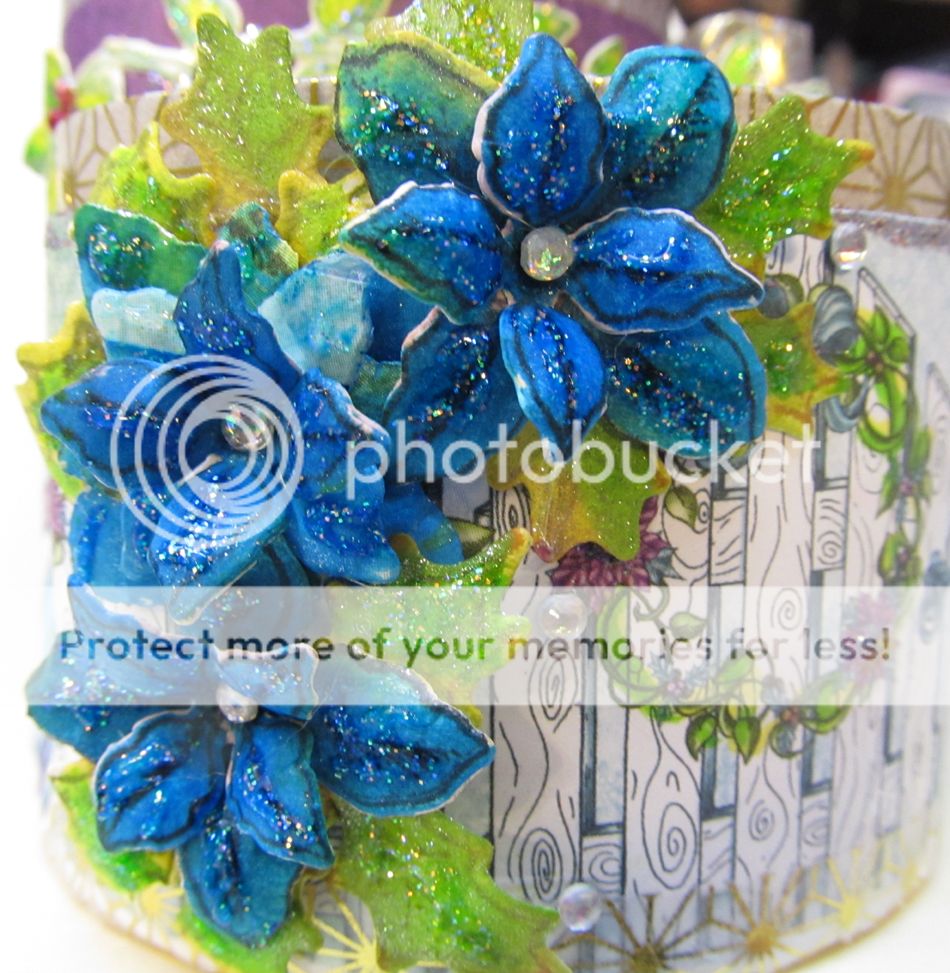 Next, stamp, color and die cut the flowers and leaves. I colored my flowers in with Spectrum Noir Sparkle pen in Boudoir and the leaves in Holly Leaf, it makes the flowers pretty glittery. I did a set of 3 flowers, for each flower I used two of the bigger petals and one of the smaller petals. For centers, I used the Want2Scrap self-adhesive bling.
Now using the dies, cut out the pre-printed Gift box images from the designer paper.
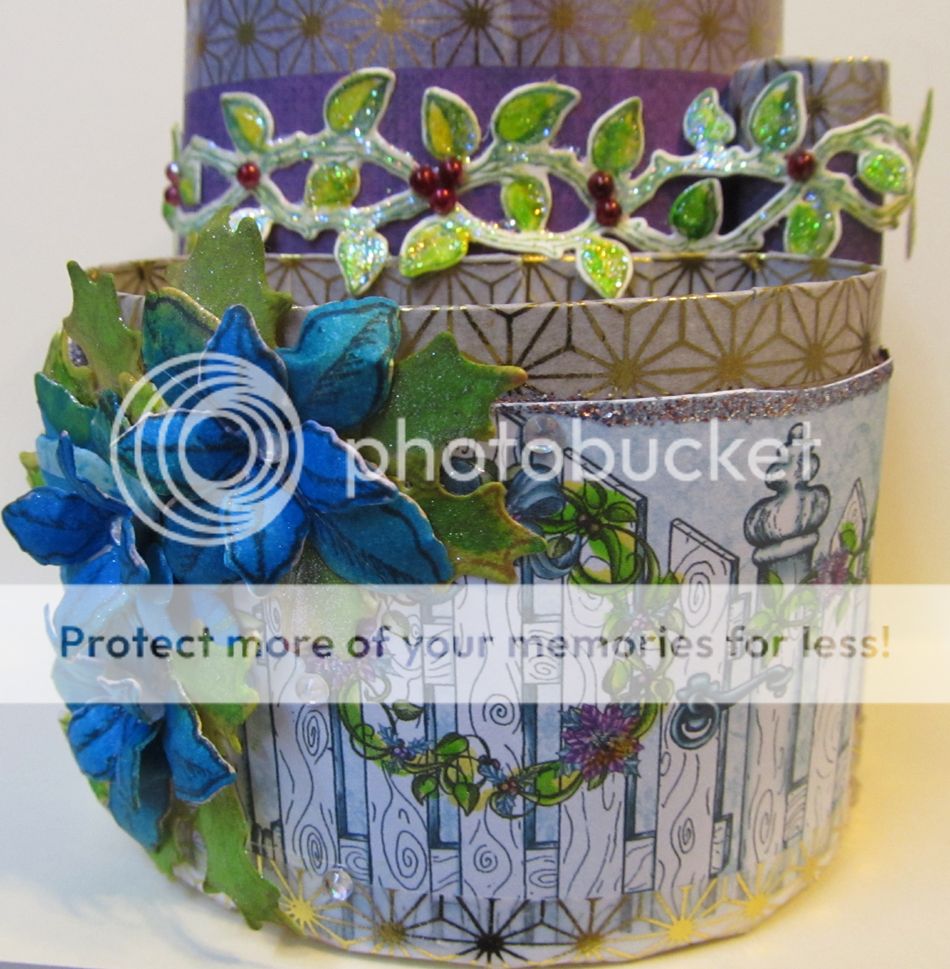 Finally, adhere the 3 poinsettias and leafs to the front of your caddy, and add the gift boxes on either side to cover where the two tubes were hot glued together. (The taller gift boxes are the perfect size for this.)
Stamp, color and die cut the leafy garland, I colored it with the Holy Leaf pen and ran it through the Xyron sticker maker. Adhere this garland around the top part of the caddy. Add some bling across the garland, and also around the flowers and leafs.
That’s it, now you can buy 3 stickle bottles, maybe a bone folder, a cool glitter pen and other yummies, wrap the caddy with cellophane tissue and give it away to some lucky friend! Have fun and enjoy!!
Tell me what you think... it will accomadate 3 small Stickle bottles...and who doesn't LOVE Stickles!
Products used:
HCDI-7104 Ornate Sleigh and Presents Die
HCD1-7016 Celebrate the Season Die
HCPC-3747 Celebrate the Season Cling Stamp Set
Celebrate the Season designer paper
Other products used... Gold Washi Tape, Want2Scrap self-adhesive bling, 3 1/2 wood circle, Stickles Diamond, cardboard/card stock, Spectrum Noir Sparkle pen Boudoir and Holy Leaf color, Apple Barrel acrylic paint in Purple, Xyron sticker maker.
Cut one 3 1/2" x 8"-- a 2" x 8" --a 3" x 1/2" and --a 1" x 8" from heavy duty chipboard/card stock, Paint one side of each piece with a coordinating color. I used dark purple acrylic paint.
Cover the 2x8 and the 1x8 piece with designer paper from the collection and glue each end to form a tube/cylinder.Cover the top of the 1 x 8 cylinder with gold washi and glue this tube inside the top of the 2x8 cylinder to make it look like there is a cylinder within a cylinder. Add Stickles to the surrounding area where the two pieces meet. Set these aside to dry.
Cover the other two pieces and also glue them together to make 2 different tubes. One will be taller than the other. Cover each of these pieces using your favorite papers from the designer paper collection. You will end up with 3 tubes in different sizes. Cover the tops with Washi of your choice, I used gold washi since it's a Christmas project.
Now adhere the two bigger tubes together. When gluing the front piece to the taller tube, elongate the tube and hold it till it adheres completely to the other cylinder. It will look like the taller tube is circular, but the smaller tube is oval, you will be able to fit 3 stickle bottles in this area. Now, the smallest tube is just big enough to hold a pencil, or other crafty tool. Adhere it on the right side of the caddy. Using Washi tape, adhere the newly created caddy to the circular wood piece to give your caddy a base.
Next, stamp, color and die cut the flowers and leaves. I colored my flowers in with Spectrum Noir Sparkle pen in Boudoir and the leaves in Holly Leaf, it makes the flowers pretty glittery. I did a set of 3 flowers, for each flower I used two of the bigger petals and one of the smaller petals. For centers, I used the Want2Scrap self-adhesive bling.Now using the dies, cut out the pre-printed Gift box images from the designer paper.
Stamp, color and die cut the leafy garland, I colored it with the Holy Leaf pen and ran it through the Xyron sticker maker. Adhere this garland around the top part of the caddy. Add some bling across the garland, and also around the flowers and leafs.
That’s it, now you can buy 3 stickle bottles, maybe a bone folder, a cool glitter pen and other yummies, wrap the caddy with cellophane tissue and give it away to some lucky friend! Have fun and enjoy!!

THANKS so much for stopping by and as always...

How creative! I love your project! I could use one of those! :D
ReplyDeleteHugs, Marie
What a wonderful project! What a great gift idea too!
ReplyDeleteThis is beautiful, as are all of your projects!! Nice job, Elsa!!
ReplyDelete