"POP UP CARD BOX"
Hello everyone... so guess what!?!?!? I made the HEART FELT DESIGN TEAM!!! I am so excited and can't wait to show you all the goodies they sent me... It's been hard keeping this a secret. I don't try out for many Designs Teams, but had always dreamed of belonging to the Heart Felt Design team because I just adore their stamps, paper and dies, but ohh I just love the flowers!
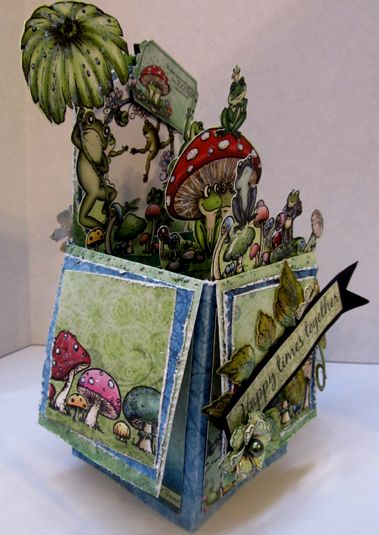
Below, is one of the projects I submitted for the finals. Hope it inspires you to create... I will be doing a video tutorial on this Pop Up Car Box soon...
 Products Used:
Winking Frog Paper Collection one 12 x 12 sheet of paper used.
Coordinating patterned paper to add to each panel of the card
Classic Leaf Stamp HCPC-3546
Classic Leaf Die HCDI-736
Hello, for this pop-up box card, I started with a 12x12 sheet of cardstock from the Winking Frog Collection.
Cut the sheet down to 7 x 11 and scored on the long side at 2.5", 5", 7.5", 10".
This will leave a 1 inch piece at the far end of the box.
Turn the sheet of paper counter clock wise and score at 3" from the top, leaving the last panel un-scored.
Cut down 3 inches from the top to the score line of each of the 4 perpendicular score lines.
At the 10" score mark, cut in at an angle up from the edge of the cards tock to remove the excess and create a tab, this will create the hinge needed to make the box.
Cut 2 strips 5" inches long and score each end at 1" inch.
These will be the strips you adhere to the inside of the box, they are the areas where you will adhere your decorations, in my case, where the frog-ies are all gathered to have fun.
Before you put the box together, decorate both side, and all box flaps with papers from the collection.
This paper is a fussy cutter's dream!! I used different sheets from the Winking Frog Paper collection to fussy cut as many frogs and mushrooms as you need. This paper is fantastic for this sort of creating.
Once box is covered, put box together making sure the hinge is glued to the inside of the box. Apply adhesive to the end tabs of the 1" x 5" strips, and adhere them to the inside of the opened box, aligning them with the top of the opening. Turning both tabs toward the outside front or back of the box will help ensure straight placement.
Now the fun starts, adhere all the fussy cut images you're using, or anything you have die cut or stamped to these strips.
Stamp, color and die cut the swirly leaf using the Classic Leaf stamp and Die and adhere it to the front flap. Using a piece of solid piece of card stock cut it into a banner and adhere one of the sayings you cut from the paper collection.
Products Used:
Winking Frog Paper Collection one 12 x 12 sheet of paper used.
Coordinating patterned paper to add to each panel of the card
Classic Leaf Stamp HCPC-3546
Classic Leaf Die HCDI-736

Hello, for this pop-up box card, I started with a 12x12 sheet of cardstock from the Winking Frog Collection.
Cut the sheet down to 7 x 11 and scored on the long side at 2.5", 5", 7.5", 10".
This will leave a 1 inch piece at the far end of the box.
Turn the sheet of paper counter clock wise and score at 3" from the top, leaving the last panel un-scored.
Cut down 3 inches from the top to the score line of each of the 4 perpendicular score lines.
At the 10" score mark, cut in at an angle up from the edge of the cards tock to remove the excess and create a tab, this will create the hinge needed to make the box.

Cut 2 strips 5" inches long and score each end at 1" inch.
These will be the strips you adhere to the inside of the box, they are the areas where you will adhere your decorations, in my case, where the frog-ies are all gathered to have fun.
Before you put the box together, decorate both side, and all box flaps with papers from the collection.
This paper is a fussy cutter's dream!! I used different sheets from the Winking Frog Paper collection to fussy cut as many frogs and mushrooms as you need.  This paper is fantastic for this sort of creating.

Once box is covered, put box together making sure the hinge is glued to the inside of the box. Apply adhesive to the end tabs of the 1" x 5" strips, and adhere them to the inside of the opened box, aligning them with the top of the opening. Turning both tabs toward the outside front or back of the box will help ensure straight placement.
Now the fun starts, adhere all the fussy cut images you're using, or anything you have die cut or stamped to these strips.
Stamp, color and die cut the swirly leaf using the Classic Leaf stamp and Die and adhere it to the front flap.  Using a piece of solid piece of card stock cut it into a banner and adhere one of the sayings you cut from the paper collection.
I hope you have creating...and as always...


great pop up card, love the layers and details, welcome to the Heartfelt Family, looksing forward to working with you this year
ReplyDeleteHello Karan! Thank you for such a warm welcome! I so look forward to working with you also!!
Deletehugs
Elsa
Elsa, this box card is fantastic! I love all the details...the froggy hangout in the background, the frog prince sitting atop the toadstool, the hint of glitter and the pretty flower with the pearl center...so much fun! Welcome to the Heartfelt Creations team...I look forward to working with you!
ReplyDeleteHELLO!!! and thank you so much! I appreciate you stopping by and for such a warm comment. I also look foward to working with you!!
DeleteHugs
Elsa
Beautiful card in a box!! Welcome to the team! Hugs!
ReplyDeleteThe box is so cute!!
ReplyDeleteLove it, love it, love it!!!
Hugs
Christiana
Such a sweet card. I love pop up cards! :D
ReplyDeleteAbsolutely Gorgeous!
ReplyDelete