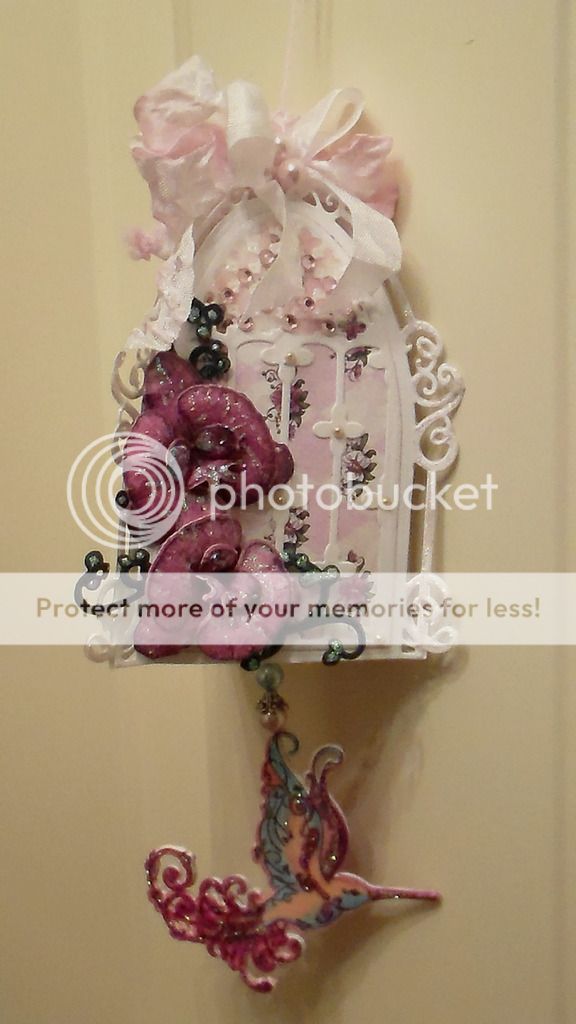
Yay! It's Wednesday AND it's a new month, so that means NEW Heartfelt Creations paper, stamps and dies!!! On to-date this is my favorite!!! Krystal, my daughters has always loved Orchids and guess what this month brings your way??? come on...guess!! ORCHIDS!!! and the most awesome window die ever. It's a biggen...you will not be disappointed... so looksie what I made for my first project... I turned that window into a humming bird cage lol Did I mention this collections also has humming birds??? I tell you,,, you all' are gonna love it!!
look.....
 Onto this floss string a pink glass bead, the bead cap, another glass bead, another bead cap and the last glass bead, I added a tad of hot glue to make sure the beads didn't roll of the floss.
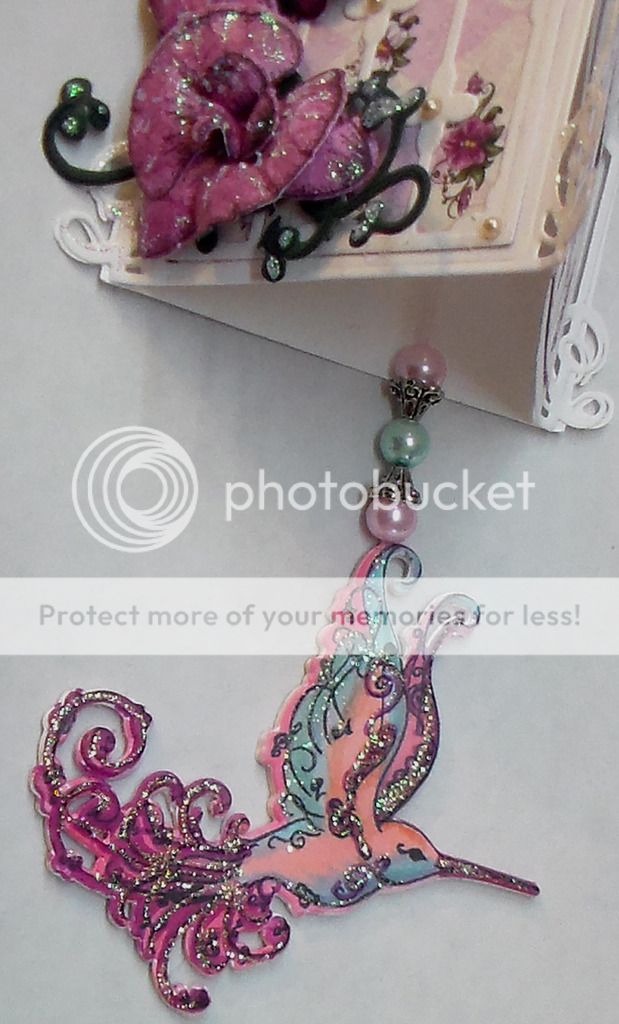 From the bottom up-- run the floss, with the hanging humming bird, and use this to connect the three window tops together.
Be gentle, so you don't beak the delicate paper tops. Now the beaded humming bird is hanging from the bottom part of the Window cage.

One more thing...I ran some pink floss through one of the top glass beads before I hot glued it to the bow to be able to hand the cage.
Visit the Heartfelt Blog to see additional inspirational pieces from the talented DT ladies...click .HERE

look.....
Products Used:
HCD1-7102 Regal Hummingbird Die
HCD1-7100 Botanic Window Die
HCD1-7101 Botanic Orchid Die
HCPC-3741 Botanic Orchid Cling Stamp Set
HCPC-3742 Regal Hummingbird Cling Stamp Set
Other products: White card stock, Stickles, 8 inch piece of Pink Floss, 3 glass beads and 2 bead caps, Memento Tuxedo Dye,
First thing I did for this project was to stamp one of the humming birds from the stamp collection on heavy white card stock and color it in with alcohol markers. I used the die to cut the colored in image plus six other, on just blank white card stock. I glued 5 of them together, just to make it really sturdy. Before adhering the 6th humming bird, I sandwiched the pink floss between the last two die cut piece. This gave the humming bird a string to be hung from.
Onto this floss string a pink glass bead, the bead cap, another glass bead, another bead cap and the last glass bead, I added a tad of hot glue to make sure the beads didn't roll of the floss.
Put this aside...
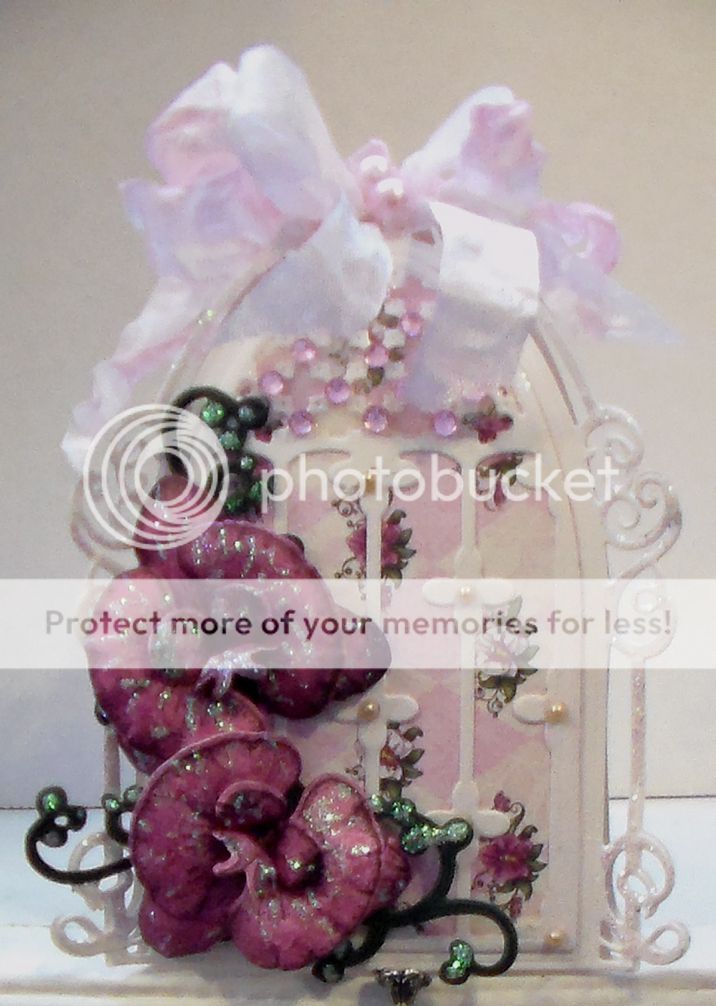
Now, cut 3 of the Botanical Windows die, there are 3 dies in this set. Use the big die first, leaving the inside solid, then cut 3 of just the 2nd die, the arch, from the designer paper, then cut 3 from the 3rd die, the inside of the window... Layer these so you can see the pretty designer paper through the window bars. (Ain't that just too cute!) Do this to all 3 windows.
From each side of the scrolled die pieces on each window, add some strong wet glue, I used Tombo glue and I adhere each window together just from the ends. This gives you sorta of a bird cage design.
From the bottom up-- run the floss, with the hanging humming bird, and use this to connect the three window tops together.Be gentle, so you don't beak the delicate paper tops. Now the beaded humming bird is hanging from the bottom part of the Window cage.
Now use the flower cling stamps mentioned above to stamp two of them on the designer paper, that way you won't have to color them in.
Die cut the stamped images, form and shape the flowers. Adhere these two flowers to the front of one of the windows and add stickles to everything you want glittery. Add some flat pearl beads, a seam binding bow to the top and decorate the bow with some glass beads and you're done.
One more thing...I ran some pink floss through one of the top glass beads before I hot glued it to the bow to be able to hand the cage.
Visit the Heartfelt Blog to see additional inspirational pieces from the talented DT ladies...click .HERE
Thank you so much for stopping by, and taking the time to comment!! I love to hear from you guys so show me sum'luv...
and as always...
Elsa, what a wonderful altered art project! Your orchids are beautiful and and I love the sparkle!
ReplyDeleteBeautiful Elsa!!
ReplyDeletecathyplus5.blogspot.com
love this bird cage idea, so clever, beautiful details too.
ReplyDeleteGorgeous!
ReplyDeleteYour hummingbird cage is gorgeous, Elsa! You are so creative!
ReplyDeleteHugs, Marie
This is a beautiful project. I love your creativity!
ReplyDeleteSimply Beautiful project!!
ReplyDelete